Integration
- Integration
- Plugins
- Integration Guide Shopware 6
- Integrationsanleitung Shopware 6
- Integration Guide Magento 2
- Integrationsanleitung Magento 2
- Integration Guide Shopware 5
- Integrationsanleitung Shopware 5
- Integration Guide WooCommerce
- Integrationsanleitung WooCommerce
- Integrationsanleitung Oxid 6
- Integration Guide Oxid 6
- Integrationsanleitung Oxid 7
- Integration Guide Oxid 7
- Installationsanleitung Magento 1
- Integration Guide Magento 1
- Channel-Server-API
- Server API - Preauthorization
- Server API - Authorization
- Server API - Capture
- Server API - Refund
- Server API - Debit
- Server API - Managemandate
- Server API - Getinvoice
- Server API - Getfile
- Server API - Vauthorization
- Server API - Creditcardcheck
- Server API - Getuser
- Server API - Updateuser
- Server API - 3dscheck
- Server API - Bankaccountcheck
- Server API - Addresscheck
- Server API - Createaccess
- Server API - Updateaccess
- Server API - Updatereminder
- Server API - General Interface Definitions
- Server API - checkout demo app
- Channel-Client-API
- Client API - Preauthorization
- Client API - Authorization
- Client API - Creditcardcheck
- Client API - Managemandate
- Client API - General Interface Definitions
- Client API - Createaccess
- Client API - Vauthorization
- Client API - Bankaccountcheck
- Client API - AJAX-Mode
- Client API - Redirect-Mode
- Client API - Addresscheck
- Client API - Hosted iFrame Mode
- Client API - Calculation of the HASH value
- PAYONE Link
- Channel-Frontend
- Response Handling
- Testdata
- NEW Hosted Tokenization Form
- Plugins
Introduction
Magento 1 has reached its end-of-life phase! We will continue to support our Magento 1 plugin for the time being. However, using outdated software poses a potential security threat to your and your customers' data. PCI DSS even requires merchants to keep their shops up to date. If you want to maintain both Magento 1 and your PCI DSS compliance, we recommend looking into initiatives like https://www.openmage.org/ or https://mage-one.com/.
Supported Payment Methods
💳 Credit Cards
- Visa, Mastercard, American Express
- JCB, Diners Club, Carte Bleue
📱 Digital Wallets
- Apple Pay
- PayPal and PayPal Express
- Alipay
- WeChat Pay
🏦 PAYONE Solutions
- PAYONE Secure Invoice
- PAYONE Secured Payments
- PAYONE Direct Debit
- PAYONE Open Invoice
- PAYONE Prepayment
🌍 Local Payment Methods
- Klarna Payments
- Ratepay Solutions
- Unzer Payments
- Bancontact, EPS, iDEAL
- PostFinance, Przelewy24
Requirements
Plugin Installation
Installation via GitHub
Download the latest version of the PAYONE Magento 1 plugin from our GitHub repository.
1. Download plugin from GitHub
2. Extract files to your Magento root directory
3. Clear cache and recompile if necessary
4. Configure plugin in admin panel
Portal Configuration
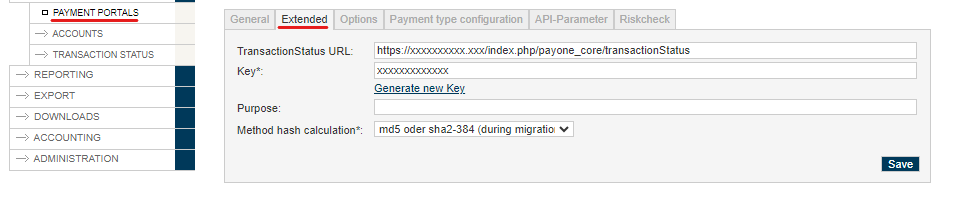
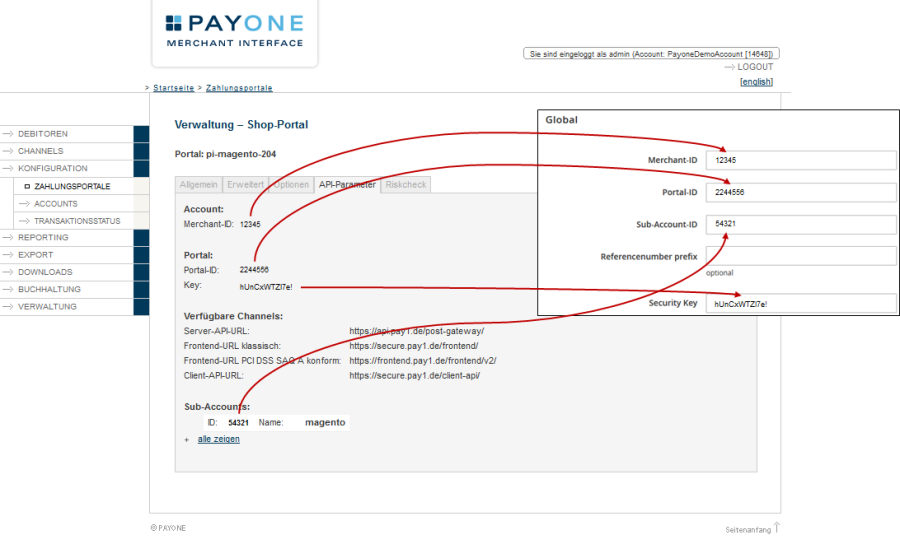
To send transaction status to the correct address, log in to the PAYONE Merchant Interface (PMI).
Navigate to: Configuration → Payment Portals → YOUR_PORTAL → Advanced → TransactionStatus URL
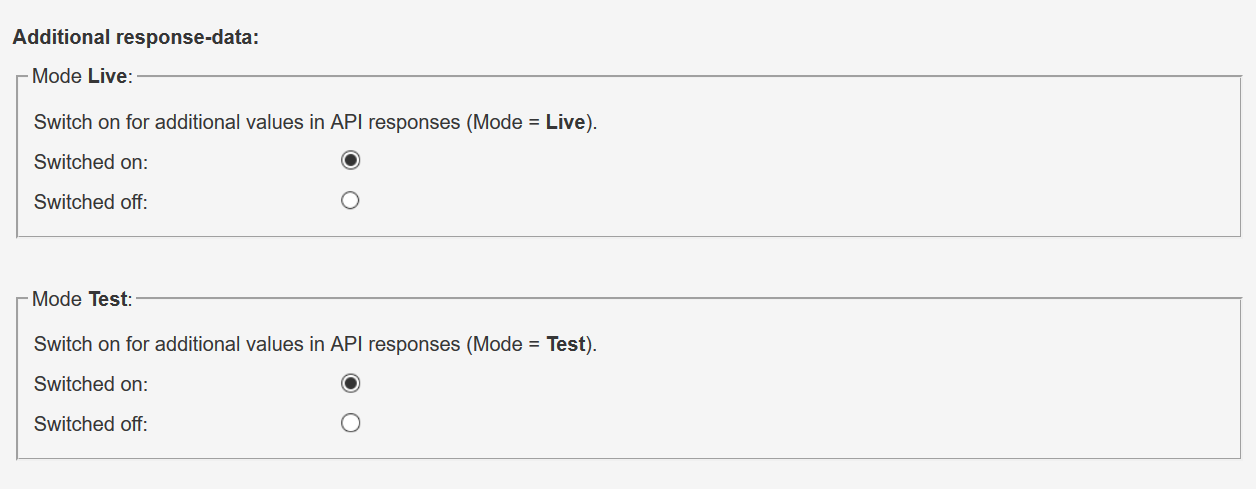
Additional Response Data
Under General, set the additional response data to "on" for both live and test mode.
Admin Configuration
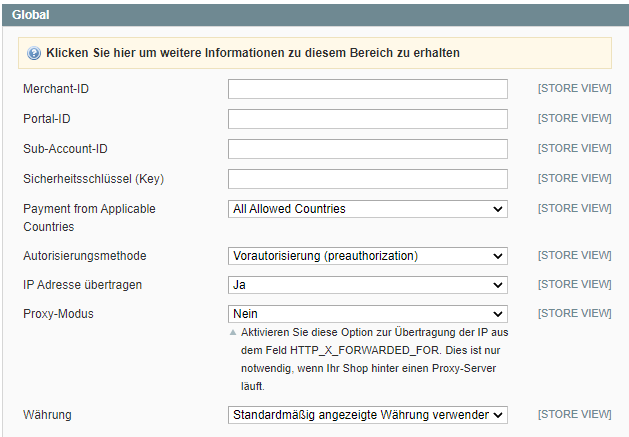
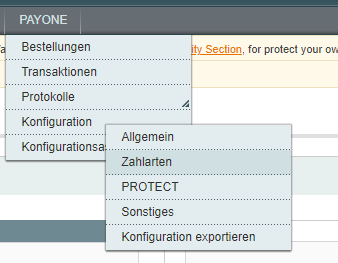
Navigate to: PAYONE → Configuration → General → Global
Please enter your credentials from the PMI here:
Here you can make additional settings
| Field | Description |
|---|---|
| Merchant ID | You can find your PAYONE Merchant ID in the top right corner of the PAYONE Merchant Interface (PMI) and on all PAYONE invoices. |
| Portal ID | You can find the Portal ID in the PAYONE Merchant Interface (PMI) under Configuration → Payment Portals |
| Sub-Account ID | You can find the ID in the PAYONE Merchant Interface (PMI) under Configuration → Accounts |
| Security Key | Please enter the key here to protect data communication from manipulation. This must be identical to the key stored in the corresponding PAYONE payment portal. |
| Payment from Applicable Countries | Selection option for the shop to specify in which countries payment via PAYONE should be enabled. |
| Authorization Method | Preauthorization: The amount to be paid is reserved during the order process. In this case, the debit must be initiated in a second step when the goods are delivered (Capture). The claim is only posted after successful capture. Authorization: The amount to be paid is collected immediately when the order is placed. The claim is immediately posted on the PAYONE platform. |
| Transfer IP Address | Choose whether the end customer's IP address should be transmitted to the PAYONE platform. Currently, the PAYONE platform only supports IPv4. If your host supports IPv6, you should disable this setting as it may result in rejected transactions. In this case, IP address verification is not possible. |
| Proxy Mode | Enable this option to transmit the IP from the HTTP_X_FORWARDED_FOR header. This is only necessary if your shop runs behind a proxy server. |
| Currency | Here you can select whether requests should be sent to the PAYONE platform in the selected currency or whether the amounts should be converted to a base currency internally in Magento beforehand. |
Payment Methods Setup
Navigate to: PAYONE → Configuration → Payment Methods
Overview

All created PAYONE payment methods are displayed in this overview. With the buttons at the top, you can add and configure additional payment methods. Via the "Edit" link, each individual payment method can be specifically configured. Please note that you should only configure the payment methods that you have ordered from PAYONE.
Add/Edit Payment Method
| Field | Description |
|---|---|
| Enabled | Determines whether the payment method is available in the checkout process. |
| Sort Order | Enter an integer that determines at which position in the checkout the payment method is offered to the customer. |
| Name | Free text input for the name of the payment method as it is displayed to the customer in the checkout. |
| Handling Fee | Determination of a handling fee per shipping method and associated countries. |
| Minimum Order Total | The minimum value of goods from which the payment method is displayed to the customer in the checkout, e.g. 100 = 100 EUR |
| Maximum Order Total | The maximum value of goods up to which the payment method is displayed to the customer in the checkout, e.g. 100 = 100 EUR |
| Mode | Here you can specify for the respective payment method whether payments should be processed in test mode or whether they should be executed "live". You can also configure test mode for individual payment methods. |
| Use Global Settings | Select Yes / No. If No is selected, all parameters from the global settings can be configured individually for this payment method. The documentation for these settings can be found under point 4.2.2. |
Special Configurations
Some payment methods require special adjustments. The following points are only relevant for you if you use the specific payment method.
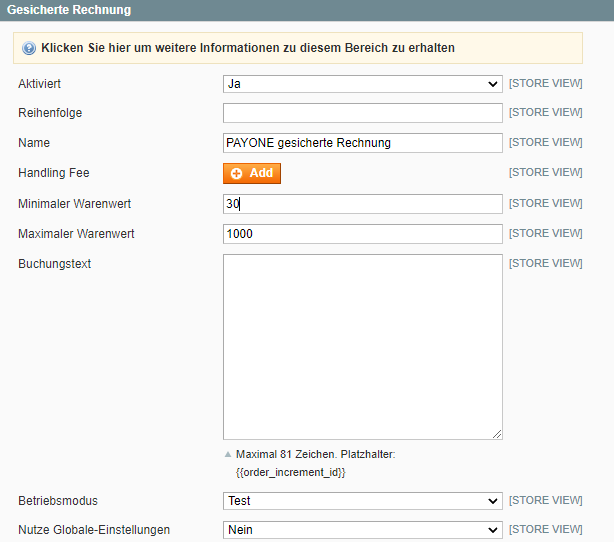
PAYONE Secure Invoice
This payment method requires a separate payment portal. Please click on PAYONE → Configuration → Payment Methods → Invoice with Payment Guarantee → Use Global Settings to No and enter a separate Portal ID under Portal ID.
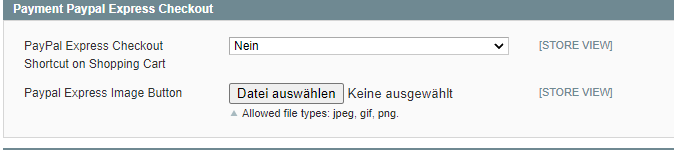
PayPal

| Field | Description |
|---|---|
| PayPal Express Checkout Link in Cart | Enables the PayPal ECS button in the cart for checkout |
| PayPal Express Image Button | Here you can upload the corresponding logo for the StoreView. |
To use PayPal ECS correctly, it is necessary to activate the PayPal module included in the Magento standard.
Ratepay
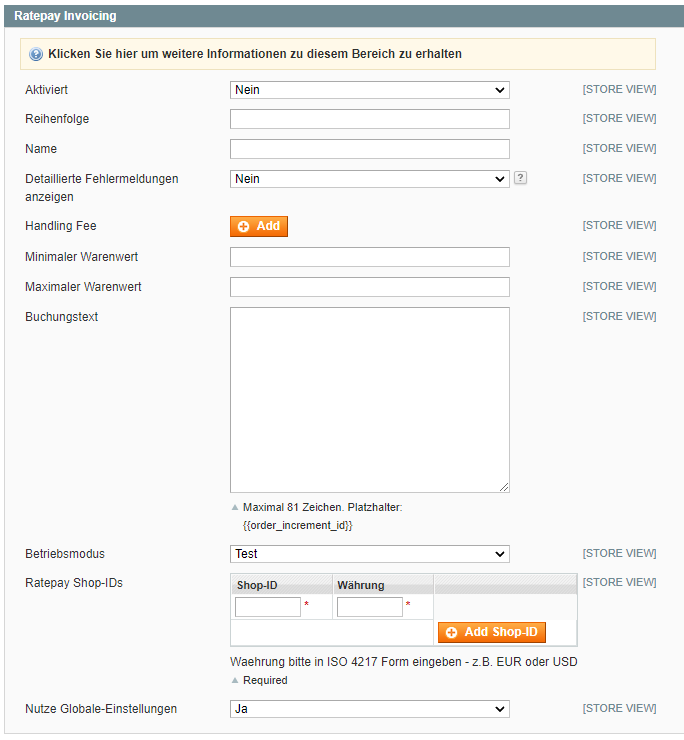
| Field | Description |
|---|---|
| Show Detailed Error Messages | Here you can select whether in case of rejection the error message transmitted by RatePay should be displayed, e.g. that the transaction could not be executed due to the credit check, or whether a generic error message should be displayed. |
| RatePay Shop IDs | RatePay requires the transmission of a so-called Shop ID that identifies the shop parameters. Enter the Shop IDs received from RatePay and the corresponding currency in ISO 4217 format (e.g. EUR, USD, DKK). When saving the configuration, the parameters are queried from RatePay and transferred to the configuration. |
Device Fingerprint Snippet ID
If you have received a custom Device Fingerprint Snippet ID from Ratepay, you can configure it under PAYONE → Configuration → General (at the end of the page). The default value is "ratepay".

RatePay Goodwill Refunds
When using adjustment refunds for RatePay transactions, please make sure to set the quantity of all items to 0 to successfully trigger the generic refund.
Credit Card
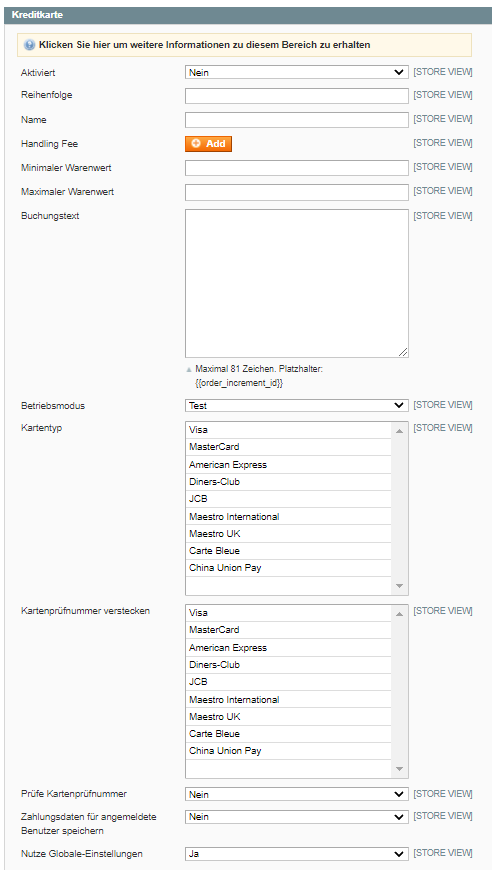
| Field | Description |
|---|---|
| Credit Card Type | Multiple selection. Which credit card brands should be offered in the frontend? |
| Hide Card Verification Number | Hides the verification number for cards that do not offer it |
| Check Card Verification Number | No / First Order with Card / Always Determines whether the credit card verification number is queried. This is only possible if the acquirer allows it
|
| Save Payment Data for Registered Users | Here you can specify whether the pseudo credit card data should be saved for registered users so that the user does not have to re-enter their credit card number when placing another order. The actual credit card data is only stored at PAYONE. |
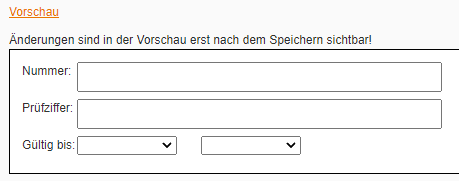
PAYONE Direct Debit
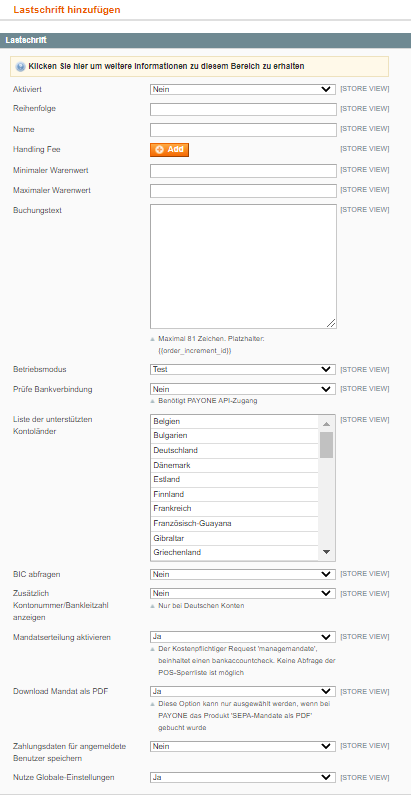
| Field | Description |
|---|---|
| Validate Bank Code | Determines whether an additional verification of the bank data should be performed. |
| List of Supported SEPA Countries | Multiple selection of countries from which the direct debit payment method is supported. The PAYONE platform currently only supports direct debits for German bank accounts. |
| Show Additional Account Number/Bank Code | Legacy option from the transition period from account number to IBAN. Please select NO. |
| Mandate Enabled | Select Yes / No. Should the SEPA mandate manager be used? Bank data verification is mandatory. Verification against the POS blacklist is not possible. |
| Mandate Download Enabled | Here you can specify whether the buyer receives a download of the mandate from PAYONE at the end of the checkout. |
| Save Payment Data for Registered Customers | Here you can specify whether IBAN and BIC of a registered user should be saved so that they do not have to be re-entered when placing a new order. The account connection is stored encrypted in the Magento database. |
Apple Pay
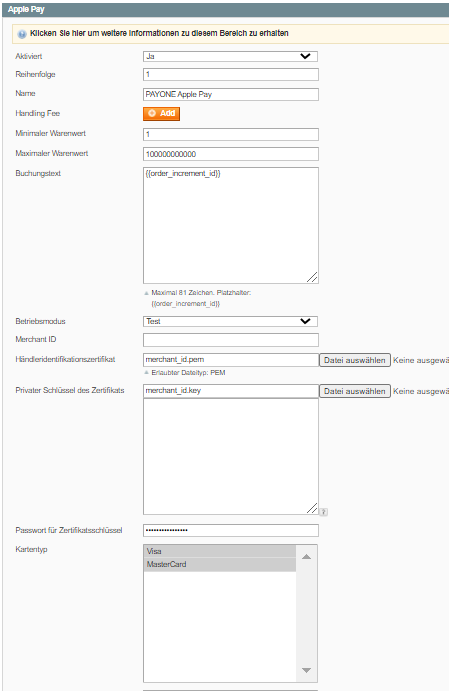
| Field | Description |
|---|---|
| Merchant ID | This value can be taken from the Apple Developer Portal as the "Identifier" of your Merchant ID: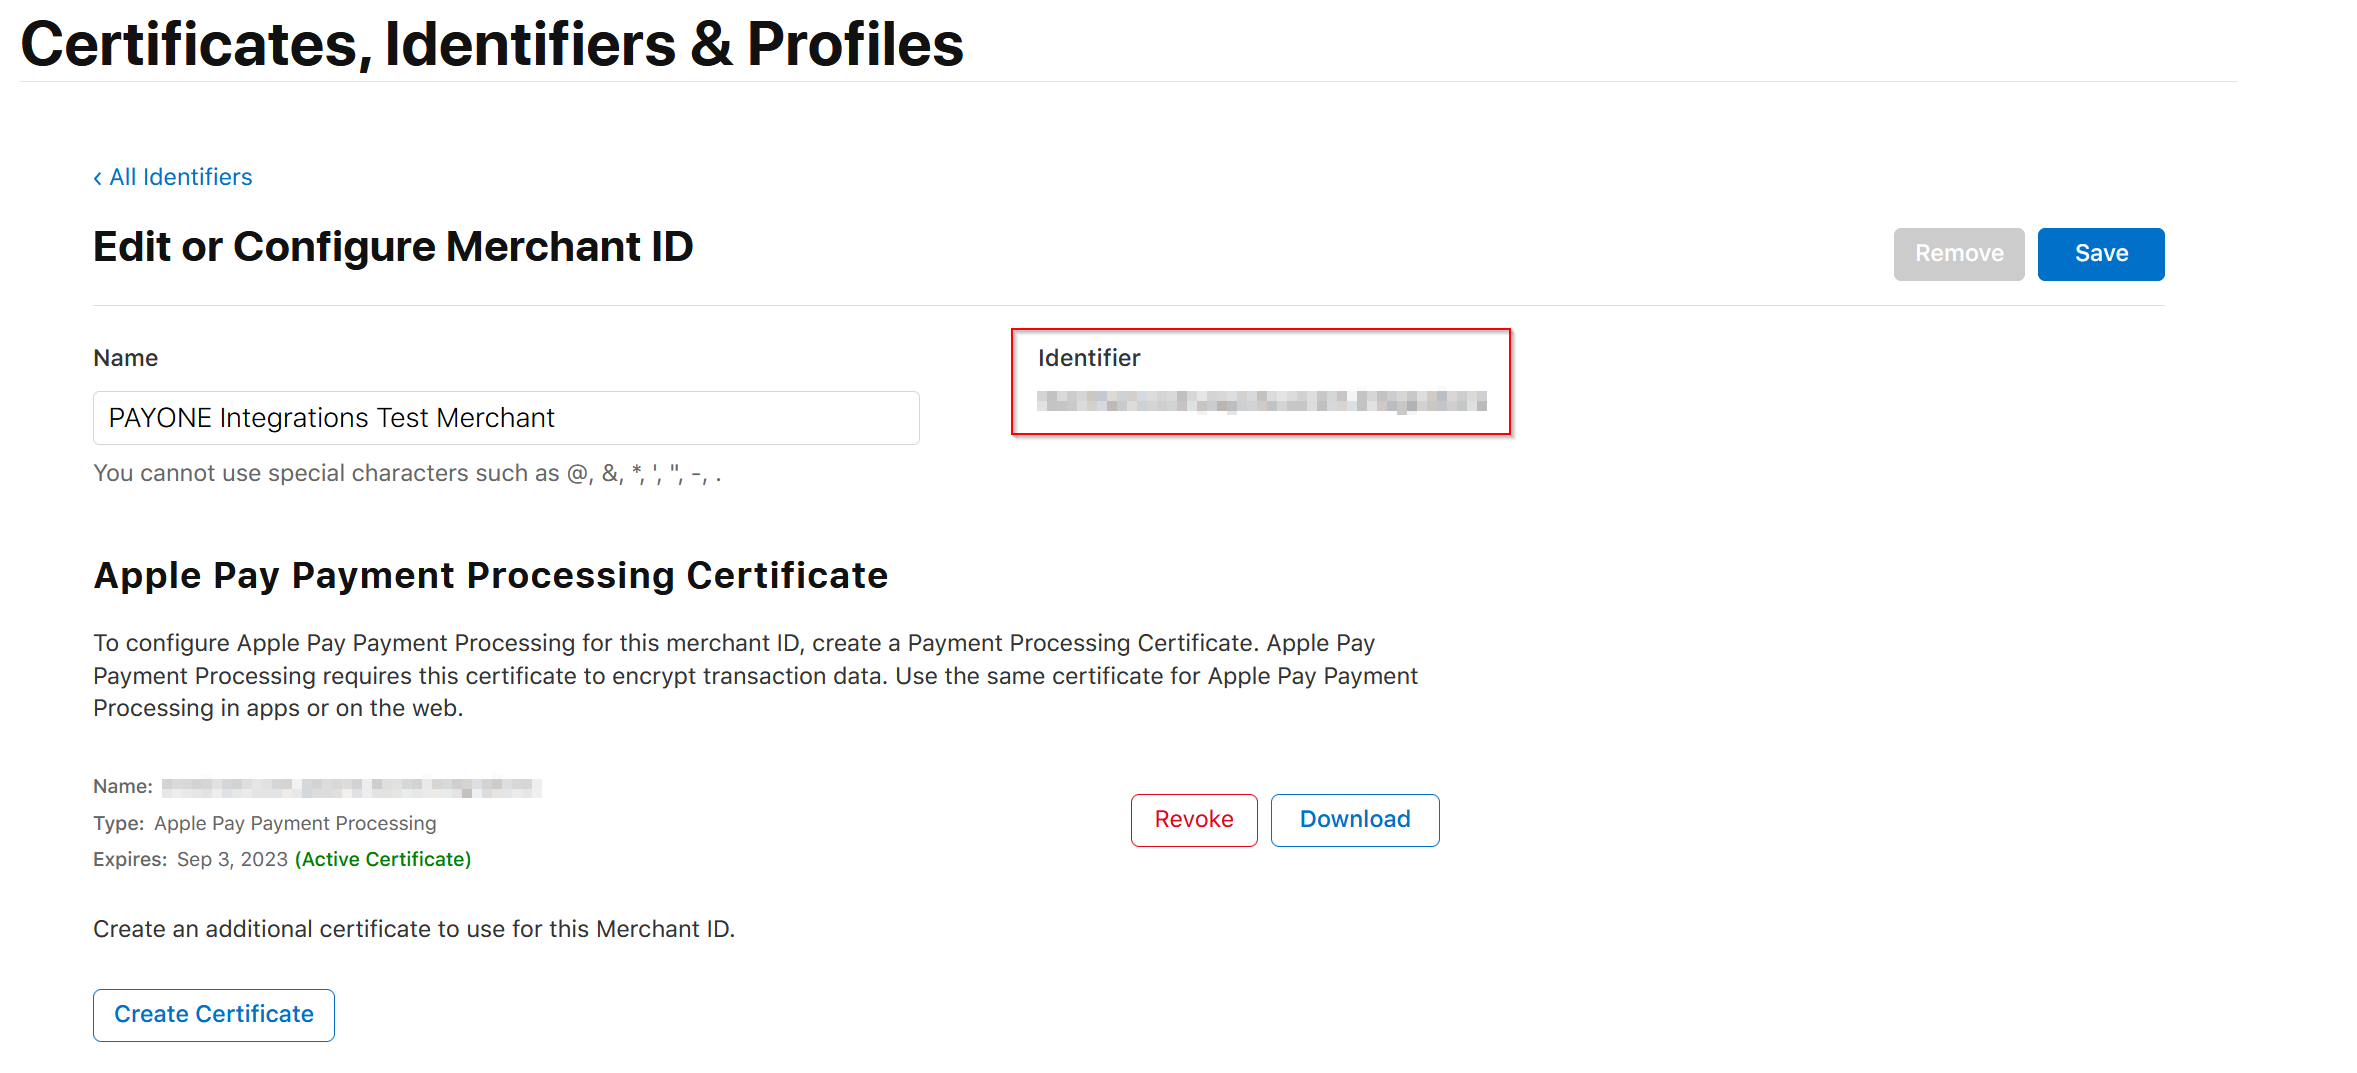 |
| Merchant Identification Certificate File | Please upload the merchant_id.perm file. You can find the file in the Apple Developer Portal. |
| Certificate Private Key | Please upload the merchant_id.key file. You can find the file in the Apple Developer Portal. |
| Certificate Key Password | Here you can set the password for using the private key |
| Credit Card Type | Select the card types that are approved for Apple Pay here. Please only select the card types that are also part of your PAYONE contract. |
In addition to the configuration in Magento, it is also necessary to set up the corresponding certificates to operate Apple Pay as a payment method. You can find instructions for this here: Special Notes - Apple Pay
Additionally, Apple requires validation of the shop domain for Apple Pay. Follow the instructions in the Apple Developer Portal for this:

Unzer Payments


| Field | Description |
|---|---|
| Company Name | The full name of the company must appear here. The name is used in the privacy policy. |
| Installment Sample Username | To retrieve the installment sample contract, the username assigned by Unzer (usually merchant name installation) must be stored here. |
| Installment Sample Password | The password assigned by Unzer must be stored here to retrieve the installment sample contract. |
| B2B Mode | When B2B mode is activated, it is automatically assumed that it is a B2B transaction if the "Company" field was filled in during address entry. To check the creditworthiness of the company, additional information such as the commercial register number is then queried in the checkout. |
| Type | Multiple selection: Here you can select which payment methods from Unzer should be available to the buyer. You can choose between purchase on account, installment payment and direct debit. |
Order Management
Navigate to: PAYONE → Orders
Overview

Here you will find a PAYONE-specific order overview similar to the Magento order overview. In addition to the standard information, you can view the payment status on the PAYONE platform, the exact type of payment (e.g. credit card brands) and, if applicable, the dunning status. Clicking on "View" opens the detail view of the corresponding order.
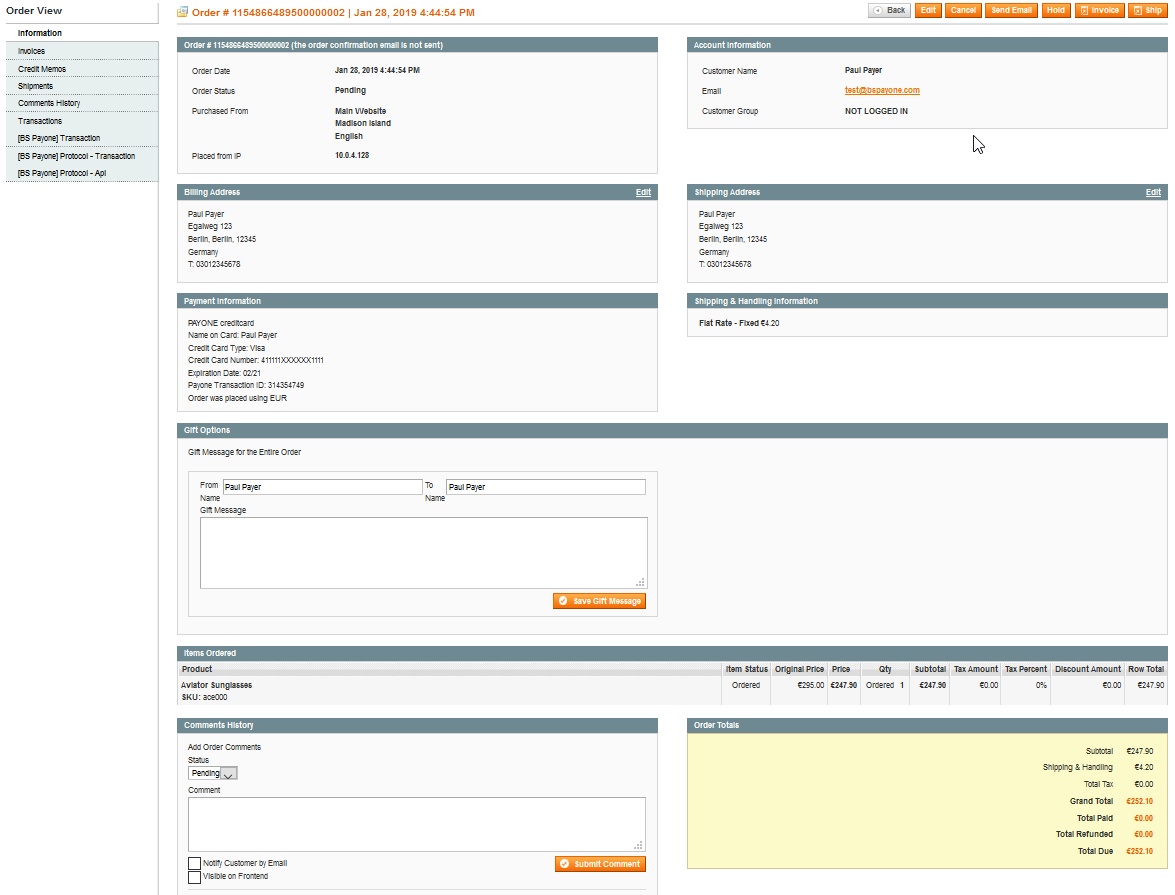
Capture Process
Preauthorized transactions must be captured to trigger the actual money flow. The PAYONE plugin takes over this step during the creation of the invoice for a specific order.
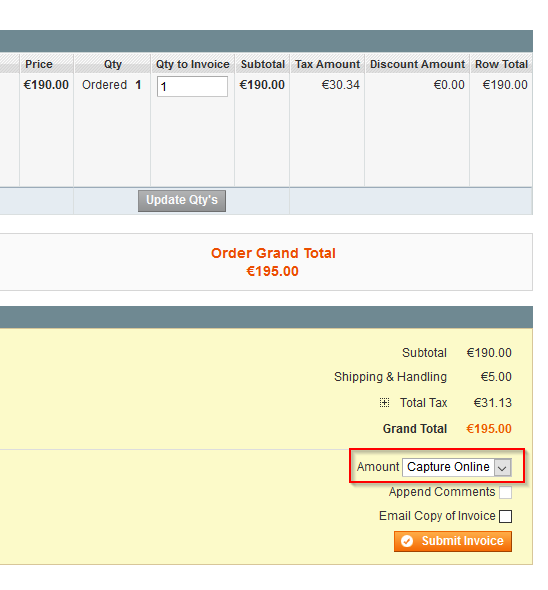
By selecting "Capture Online" from the dropdown, the claim is collected on the PAYONE platform. If you don't want to capture the money but still want to create an invoice, use "Capture Offline" instead.
Partial captures are also possible by simply adjusting the invoiceable quantity of the items.
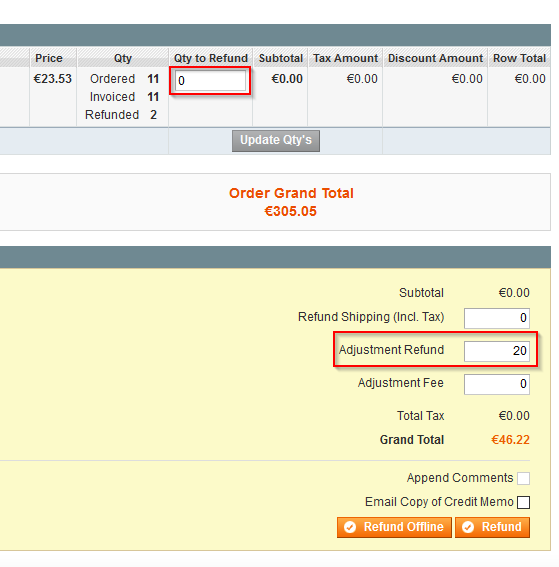
Refund Process
Already captured money can be returned by creating a credit memo for an existing invoice.
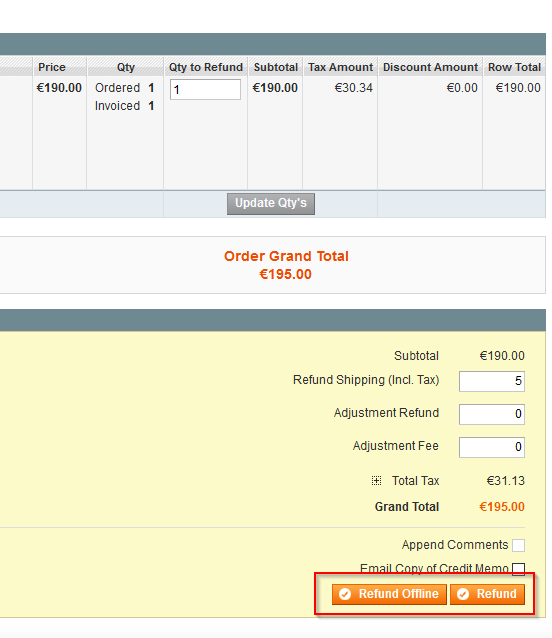
By selecting the "Refund" button, money is sent back to the customer's payment method. "Refund Offline" creates the credit memo but does not trigger any money flow.
Partial refunds are possible using the same method as partial captures. You can also adjust the refund amount to account for fees during the refund, but keep in mind that some payment methods rely on the cart items matching the original order.
Advanced Configuration
Here you will find separate setting options that allow you to adapt our plugin more precisely to your needs.
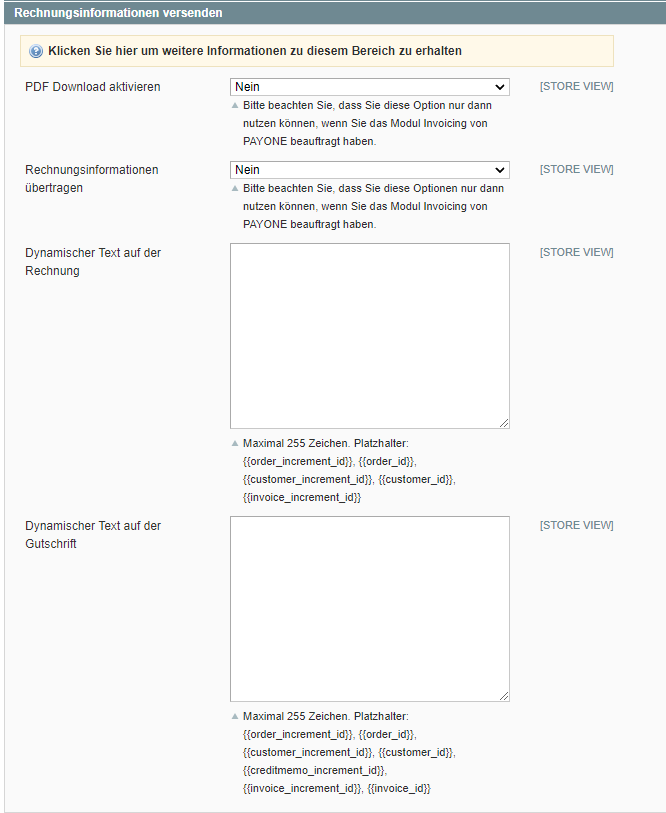
Send Invoice Information
Click on PAYONE → General → Send Invoice Information to enable the transmission of item data for creating an invoice on the PAYONE platform.
The text can be freely chosen and appears as dynamic text on the invoice or credit memo. Various Magento variables can be used as placeholders.
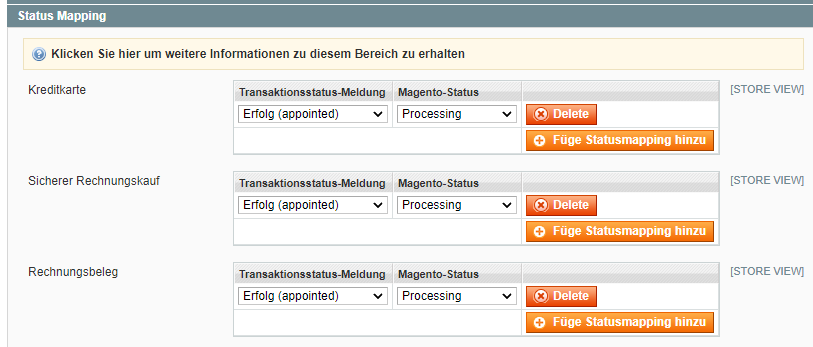
Status Mapping
Navigate to: PAYONE → Configuration → General → Status Mapping
The various transaction statuses of the PAYONE platform can be assigned to Magento order statuses. When a new transaction status is received, the corresponding "Magento status" is set in the order overview in the Magento backend. This can be entered separately for each payment method.
Credit Card CSS Customizations
Our plugin offers you compliance with the "lowest" compliance level according to PCI DSS (SAQ A). Since in this compliance level all credit card data may only be entered in fields hosted by a PCI DSS certified service provider, our extension uses iFrames that are integrated into the checkout. However, these do not inherit the CSS of the shop template, but contain their own style. You can use the following settings under PAYONE → Configuration → General → Credit Card Payment to customize these fields.
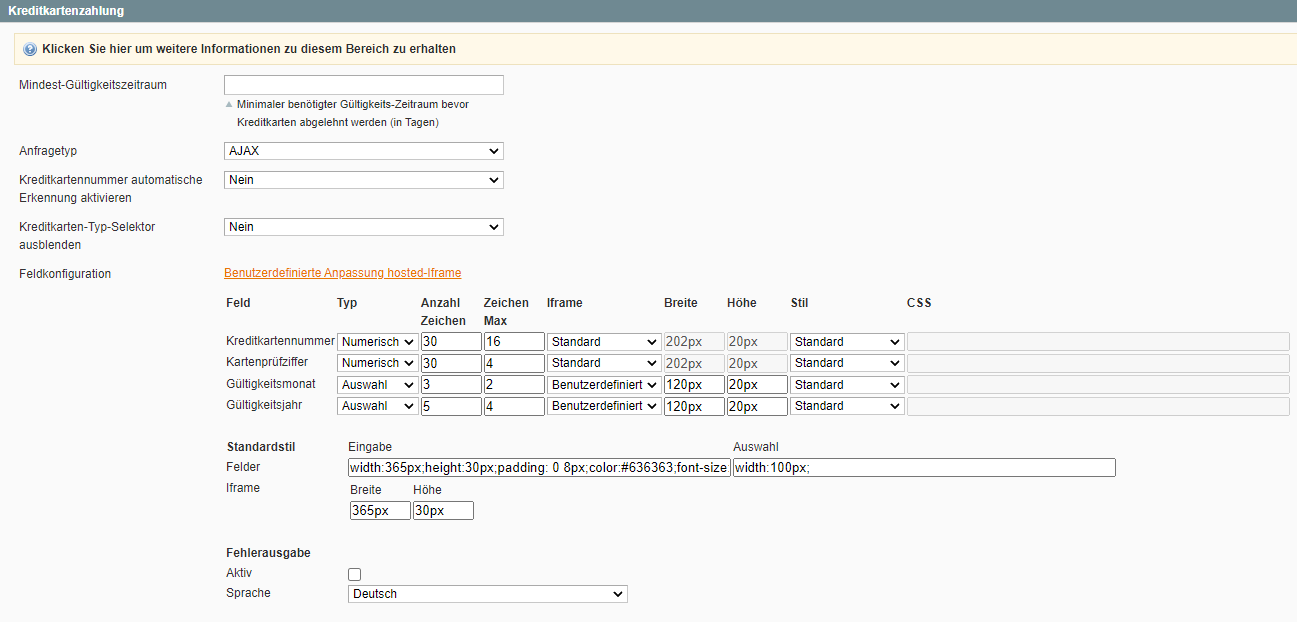
| Field | Description |
|---|---|
| Minimum Validity Period | Enter an integer in days. This value defines the number of days a credit card must be valid before it is rejected at checkout. |
| Request Type | hosted-iFrame / AJAX Make sure you always use "hosted iFrame". Only merchants with a PCI DSS certification level of SAQ A-EP or higher are allowed to use AJAX. We still strongly recommend using hosted iFrame!
|
| Input Configuration | Here you can set separate parameters for the individual fields of the credit card query. |
| Type | Numeric - Only numbers are allowed and the numeric keyboard is used for mobile devices input type="tel". Password - input type="password" Text - input type="text" |
| Number of Digits | Length of the field in characters (HTML attribute size) |
| Max Digits | Maximum input length (HTML attribute maxlength) |
| IFrame | Standard - Uses width and height from the default style Custom - Uses width and height from the following fields |
| Width | CSS - specify width |
| Height | CSS - specify height |
| Style | Standard - Uses CSS specification from standard Custom - Uses CSS specification from the following field |
| CSS | Specification of CSS properties for field Disabled when Standard is selected above |
| Default Style | |
| Fields | Input - CSS specification for all input fields (HTML input) Selection - CSS specification for all selection fields (HTML select) |
| IFrame | Width - CSS specification Height - CSS specification |
| Error Output | |
| Language | Select the language in which the error message should be output. |
| Enable Automatic Credit Card Number Detection | Determines whether the card number should be automatically determined when the first six digits are entered. |
Preview
At this point you can see how the appearance will look in the checkout according to the previous setting of the credit card payment method.
Simple Protect
Simple Protect is the simple and flexible way to use all the data you have, exactly at the moment your shop processes the checkout. You can gain information from, for example:
- Your Magento 1 shop database
- The current checkout session
- External sources that can be reached and accessed from the shop server (data warehouse; csv / xml / txt files accessible with PHP; APIs or extensions like the PAYONE Protect functions and many more.)
Here is an example of some complex decisions that can be made with our Simple Protect framework:
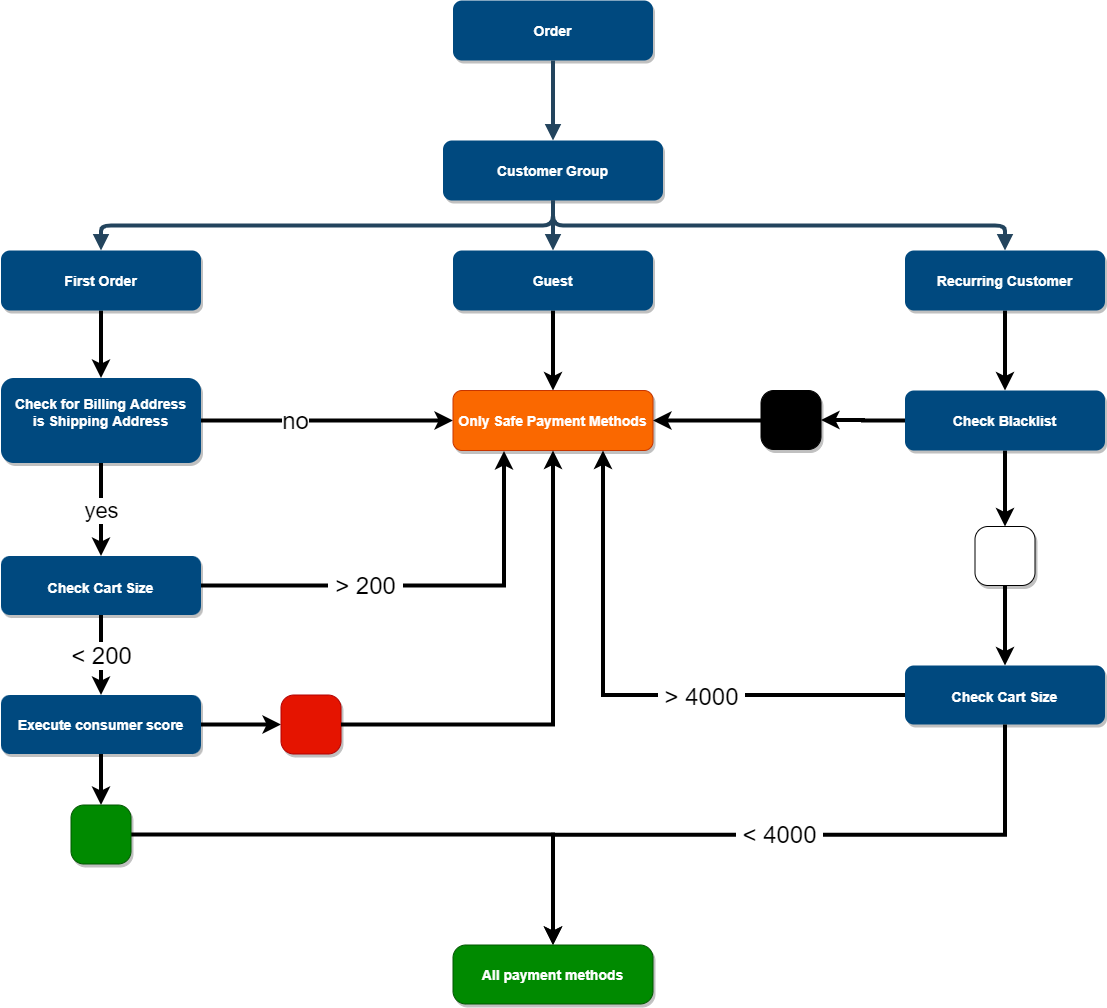
ℹ️ Beta Status: Simple Protect is currently in beta status. If you want to use this functionality, you need to download the PAYONE integration from the Simple Protect branch:
https://github.com/PAYONE-GmbH/magento-2/tree/simple-protect
After that, please follow the instructions for installing the Simple Protect template here:
Protect (Legacy)
Navigate to: PAYONE → Configuration → PROTECT
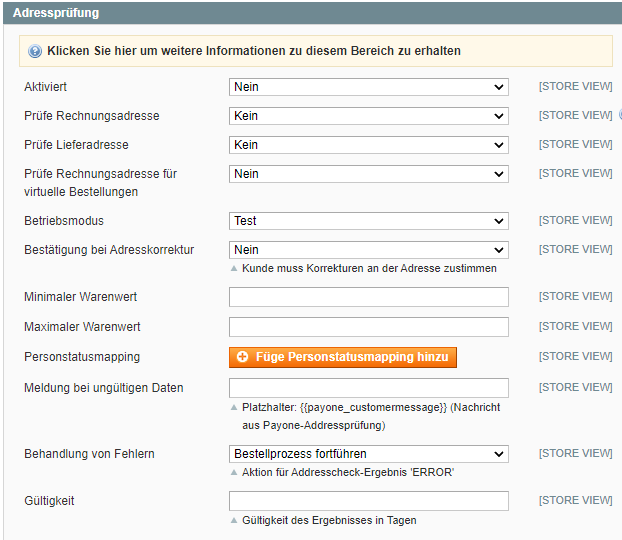
Address Validation
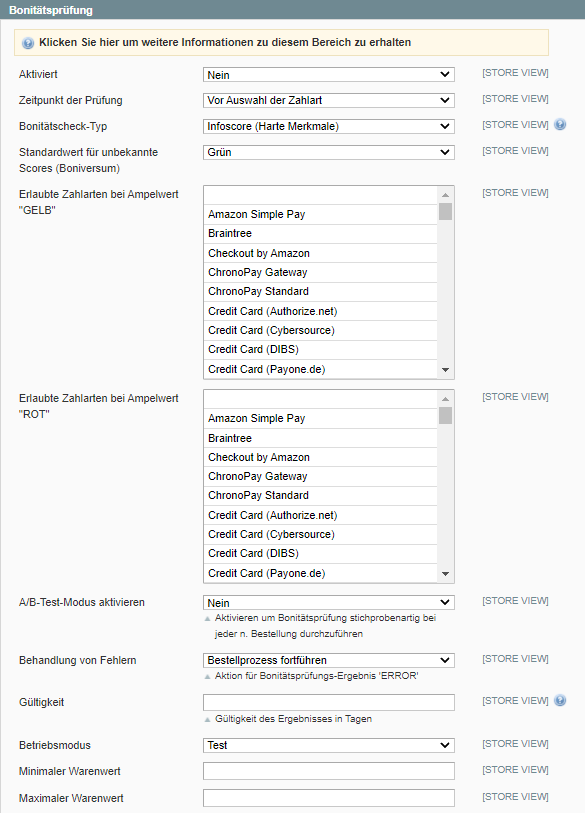
Credit Check


Invoice Data
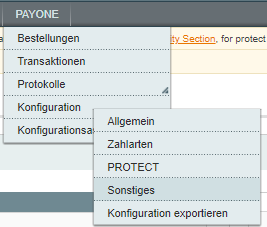
Navigate to: PAYONE → Configuration → Miscellaneous

Invoice Information - Shipping Costs

Invoice Information - Credit Memo

Email Configuration
Navigate to: PAYONE → Configuration → Miscellaneous
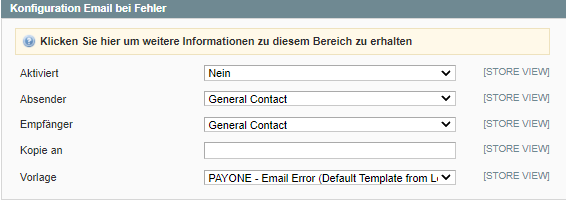
Configuration Email on Errors
Email Configuration AVS
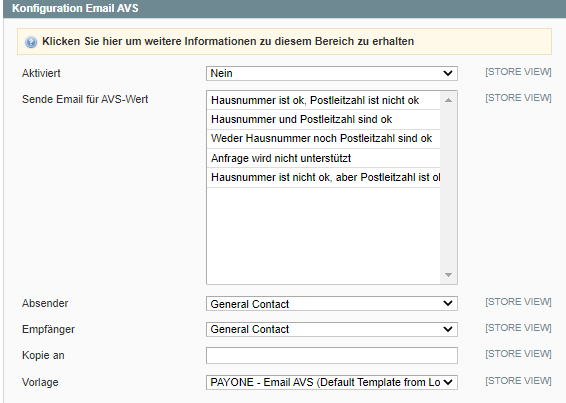
The Address Verification System (AVS) is an American Express address verification system. The billing address entered by the end customer is compared with the billing address of the credit card.
Export Configuration
Navigate to: PAYONE → Configuration → Export Configuration
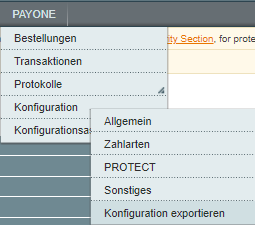
By clicking "Export Configuration" a file is downloaded.
You can now open and view or save this file with an XML editor. This export is very important for any support request to the PAYONE team to avoid possible configuration problems. This file can also be used to determine if additional extensions have been installed that could cause compatibility issues.
Transaction Status
Navigate to: PAYONE → Transactions
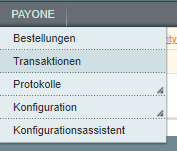
Overview

Here you will find an overview of all transactions processed via PAYONE. By clicking "View" you can display details of the corresponding transaction. You also have the option to filter by payment method, status or amount, for example.
PAYONE Logs
Navigate to: PAYONE → Logs
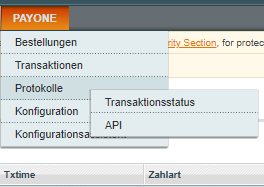
Under the Logs menu item you will find all information about processed payments and communication with the PAYONE platform.
Transaction Status Logs
Navigate to: PAYONE → Logs → Transaction Status
Overview

The Transactions submenu item shows the transaction status notifications received by Magento for each order and transaction. These notifications are sent from the PAYONE platform to your shop. In case of errors, you can find out here whether the transaction status was received correctly and what the current status is for a transaction. By clicking "View" you can display details about a transaction status.
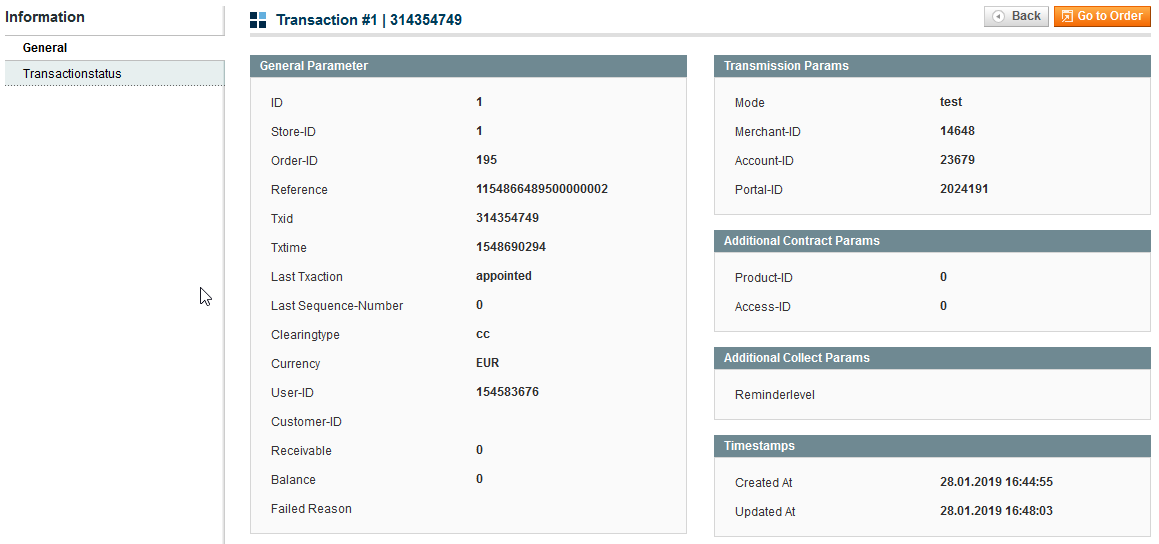
Details
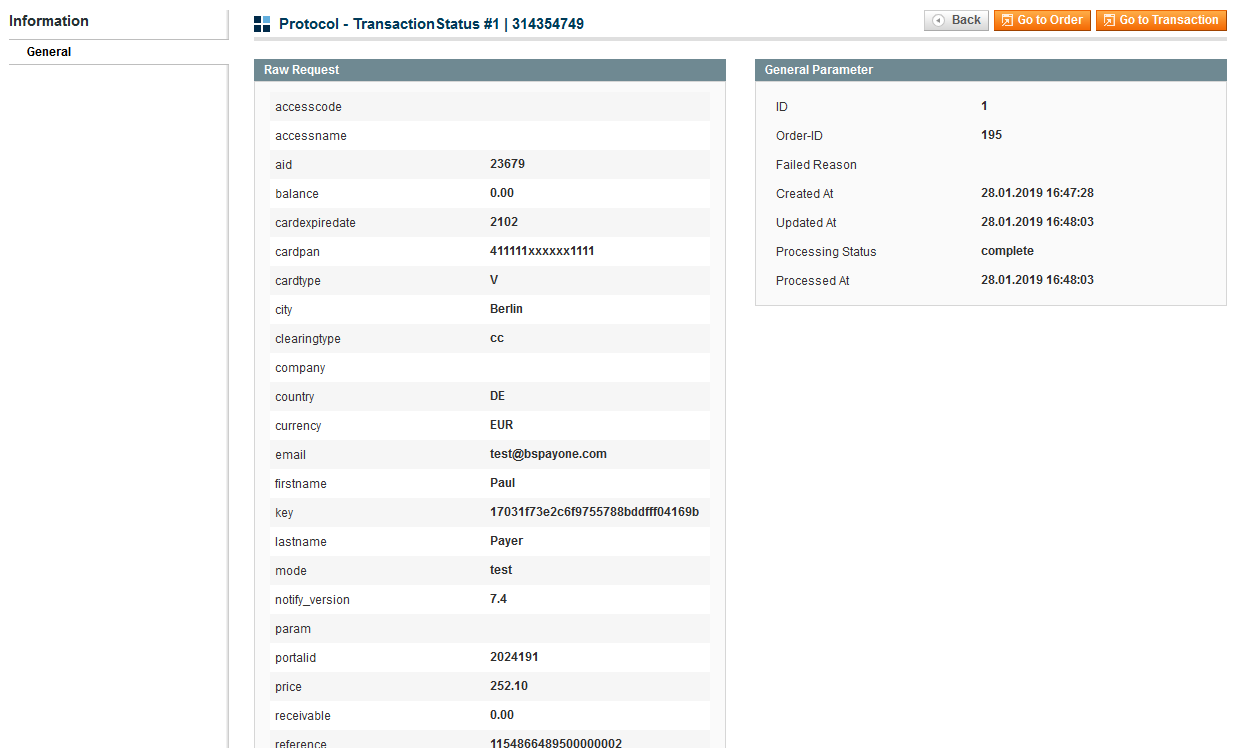
On the detail page you can see all transaction status information that was transmitted to your shop via the PAYONE platform. This way you can always track which data your Magento shop has received and processed.
A detailed explanation of the respective parameters can be found in the technical documentation of the PAYONE platform in the PAYONE Merchant Interface (PMI) under Downloads → Documentation.
API Logs
Navigate to: PAYONE → Logs → API

Overview

In this overview you will find all requests from the Magento shop to the PAYONE platform as well as the responses from the PAYONE platform to these requests. Only the requests that were transmitted to the PAYONE platform via the Client API are not listed in this overview. This applies to credit card information that is transmitted directly from the buyer's browser to the PAYONE platform using Ajax technology so that your shop does not come into contact with sensitive credit card information. By clicking "View" you can display an API request in detail.
Details
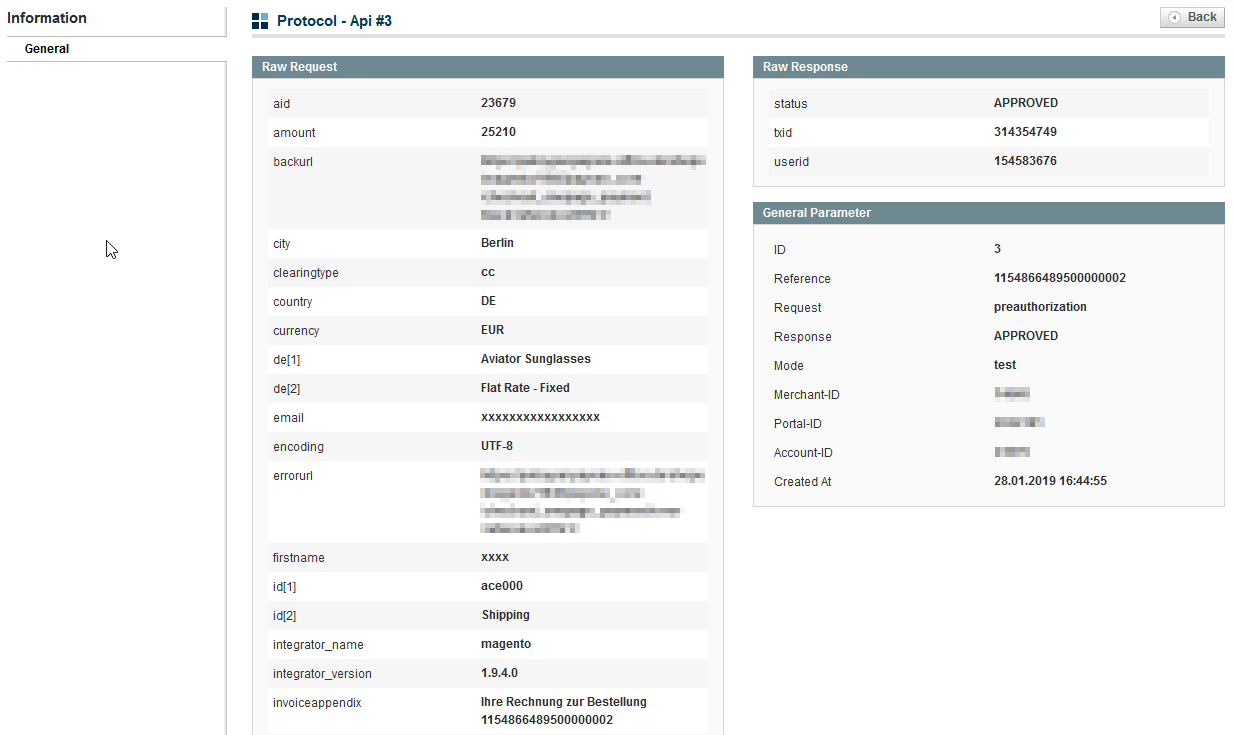
In the left column you can see the request that the Magento shop sent to the PAYONE platform. On the right you will find the response. A detailed explanation of the respective parameters can be found in the technical documentation of the PAYONE platform in the PAYONE Merchant Interface (PMI) under Downloads → Documentation.