Integration
- Integration
- Plugins
- Integration Guide Shopware 6
- Integrationsanleitung Shopware 6
- Integration Guide Magento 2
- Integrationsanleitung Magento 2
- Integration Guide Shopware 5
- Integrationsanleitung Shopware 5
- Integration Guide WooCommerce
- Integrationsanleitung WooCommerce
- Integrationsanleitung Oxid 6
- Integration Guide Oxid 6
- Integrationsanleitung Oxid 7
- Integration Guide Oxid 7
- Installationsanleitung Magento 1
- Integration Guide Magento 1
- Channel-Server-API
- Server API - Preauthorization
- Server API - Authorization
- Server API - Capture
- Server API - Refund
- Server API - Debit
- Server API - Managemandate
- Server API - Getinvoice
- Server API - Getfile
- Server API - Vauthorization
- Server API - Creditcardcheck
- Server API - Getuser
- Server API - Updateuser
- Server API - 3dscheck
- Server API - Bankaccountcheck
- Server API - Addresscheck
- Server API - Createaccess
- Server API - Updateaccess
- Server API - Updatereminder
- Server API - General Interface Definitions
- Server API - checkout demo app
- Channel-Client-API
- Client API - Preauthorization
- Client API - Authorization
- Client API - Creditcardcheck
- Client API - Managemandate
- Client API - General Interface Definitions
- Client API - Createaccess
- Client API - Vauthorization
- Client API - Bankaccountcheck
- Client API - AJAX-Mode
- Client API - Redirect-Mode
- Client API - Addresscheck
- Client API - Hosted iFrame Mode
- Client API - Calculation of the HASH value
- PAYONE Link
- Channel-Frontend
- Response Handling
- Testdata
- NEW Hosted Tokenization Form
- Plugins
Introduction
Our WooCommerce plugin is regularly updated and provides a versatile, ready-to-use solution for easy online payment acceptance.
Supported Payment Methods
💳 Credit Cards
- Visa, Mastercard, American Express
- JCB, Diners Club
📱 Digital Wallets
- Google Pay
- Amazon Pay (v2)
- PayPal and PayPal Express
- PayPal v2 and PayPal Express v2
- Alipay
- WERO
🏦 PAYONE Solutions
- PAYONE Secure Invoice
- PAYONE Secured Payments
- PAYONE Direct Debit
- PAYONE Open Invoice
- PAYONE Prepayment
🌍 Local Payment Methods
- Klarna Payments
- Ratepay Solutions
- Bancontact
- EPS, iDEAL
- Przelewy24
Requirements
Plugin Installation
You have 2 ways to install our plugin:
Installation directly in WooCommerce - Admin
- Download the free PAYONE plugin from the WordPress Store.
- Upload the plugin in your store under WooCommerce → Plugins → Add New.
- Install and activate the plugin.
Installation via GitHub
Download the latest version directly from GitHub and install it manually in your WooCommerce installation.
Extract the archive to: /wp-content/plugins/payone-woocommerce-3
Portal Configuration
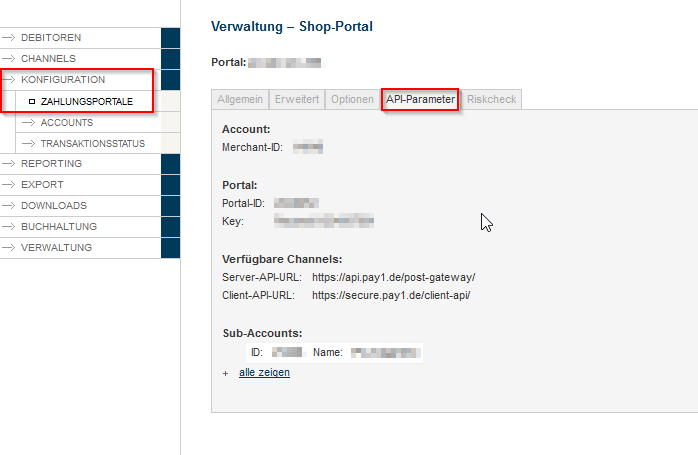
To send the transaction status to the correct address, please log in to the PAYONE Merchant Interface (PMI).
Navigate to: Configuration → Payment Portals → YOUR_PORTAL → Advanced → TransactionStatus URL

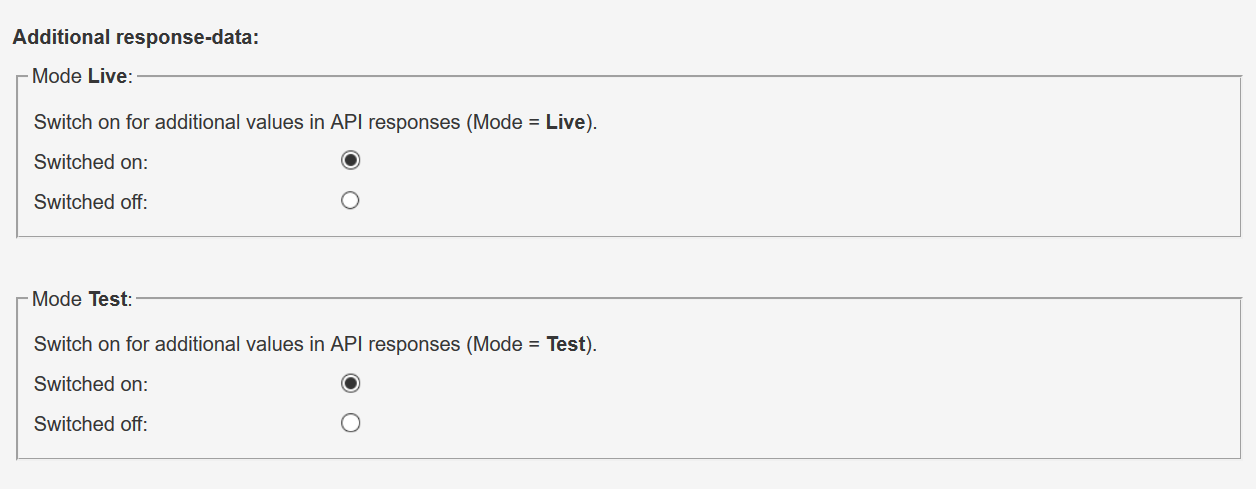
Additional Response Data
Under General, set the Additional Response data for both Live and Test modes to "on".
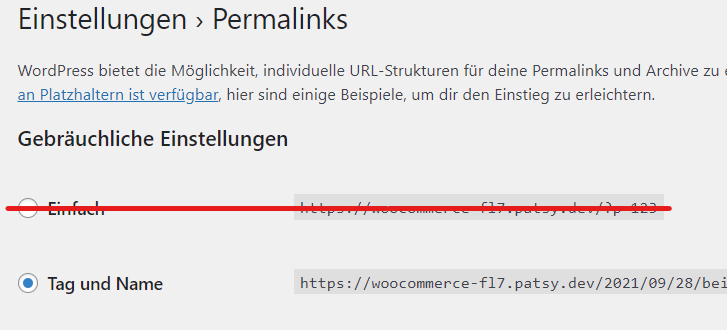
It is important that the Permalink settings under Settings → Permalinks are not set to "Plain".
WooCommerce - Admin Configuration
Click on PAYONE. Please enter your access data here:
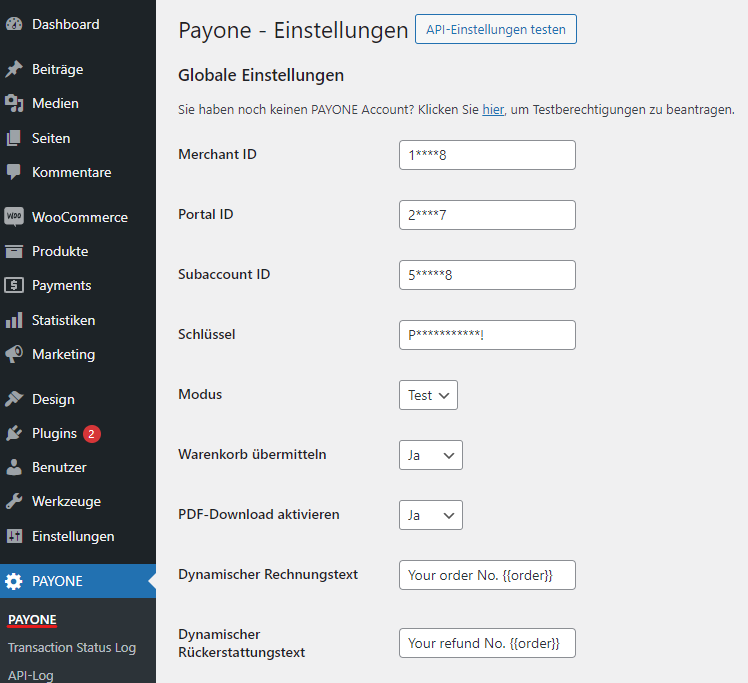
By clicking on "Test API setting" you can check if your data has been entered correctly.
| Field | Description |
|---|---|
| Merchant-ID | You will find your PAYONE Merchant ID at the top right of the PAYONE Merchant Interface (PMI) and on all PAYONE invoices. |
| Portal-ID | You can find the portal ID in the PAYONE Merchant Interface (PMI) under the menu item Configuration → Payment Portals |
| Subaccount-ID | You can find the ID in the PAYONE Merchant Interface (PMI) under the menu item Configuration → Accounts |
| Key | Please enter the key here to protect the data communication against manipulation. This must be identical to the key stored in the corresponding PAYONE payment portal. |
| Mode | Here you can specify for the respective payment type whether the payments are to be processed in test mode or whether they are to be executed "live". You can also configure the test mode for individual payment types. |
| Submit Cart | Here you can configure whether the shopping cart information should be transferred to the PAYONE platform for each request. |
| Activate PDF Download | If activated, a link will be offered after the order has been placed, via which the end customer can download the SEPA Mandate as a PDF file.
This product must be ordered separately.
|
| Dynamic Invoice Text | Specifies whether and (if yes) which dynamic text should appear on an invoice generated by PAYONE.
The contents of the field are transferred in the parameter "invoiceappendix". The maximum length is 255 characters and different WooCommerce variables can be used as placeholders. You can use {{order}} to reference the current order number in WooCommerce in the request.
|
| Dynamic Refund Text | You can specify the dynamic text that will appear on credits created by the PAYONE platform. (see above) |
| API-Log | Specifies whether the log for API calls from WooCommerce to PAYONE should be activated.
The API logs may contain personal information. Please ask your legal advisor or data protection officer about data protection implications.
|
| Transaction Status Log | Specifies whether a log is to be kept of the transaction status messages received from the shop system.
|
The required data for the setup can be found in the PMI:
Payment Methods Setup
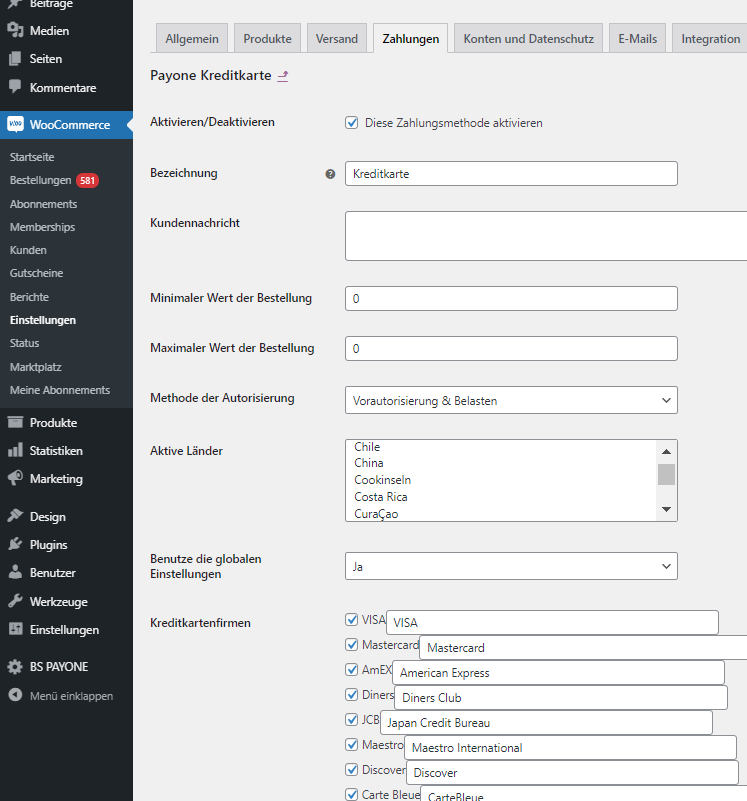
You can access the settings for the individual payment methods via the WooCommerce menu (WooCommerce → Settings → Payments). Payment methods provided by the PAYONE plugin are marked with the prefix "PAYONE".

Configuration Options
All payment methods offer certain basic options.
| Field | Description |
|---|---|
| Enable/Disable | Specifies whether the payment type is to be displayed in the checkout. |
| Title | Specifies the name of the payment type in the checkout. |
| Customer Message | Here you can define an additional message to be displayed when you select the payment type. |
| Minimum Order Value | The payment type is only displayed from this shopping basket value onwards. |
| Maximum Order Value | The payment type is no longer displayed if the market-basket value exceeds this total. |
| Method of Authorization | Indicates whether the payment type is addressed by "authorization" or "preauthorization".
Which authorization method is used for which payment method can have an effect on the cash flow. Which method you should use depends strongly on the business model and the payment type.
|
| Active Countries | In which countries should the selected payment method be active? By default, Germany, Austria and Switzerland are active. You can add or deselect further countries by "ctrl+click". |
| Use Global Settings | With this option, the global settings for the shop can be overwritten for specific payment methods.
|
Special Customizations
Some payment methods require special adjustments. The next points are only relevant to you if you use the specific payment method:
These two payment methods require their own payment portal. Please enter under WooCommerce → Settings → Payments → PAYONE Secured Invoice or PAYONE Secured Installment → Use global settings "no" → Portal ID a separate portal ID.
| Field | Description |
|---|---|
| Credit Card Brand | Here you can activate the credit card brands to be used for checkout. You can also define user-defined names for the individual brands. |
| Minimum Validity of Card | Specifies the number of days a credit card used must still be valid for a transaction.
Credits on expired credit cards are not possible.
|
User-defined display for the hosted iframe
The WooCommerce Extension offers the conformity with the "lowest" Compliance Level according to PCI DSS (SAQ A). Since in this compliance level all credit card data may only be entered in fields hosted by a PCI DSS certified service provider, our extension uses iFrames that are integrated into the checkout. However, these do not inherit the CSS of the shop template, but contain their own style. You can use the following settings to customize these fields.
| Field | Description |
|---|---|
| Type |
|
| Digit Count | Length of the field in characters (HTML attribute size) |
| Max Digits | Maximum length of input (HTML attribute maxlength) |
| IFrame |
|
| Width | CSS - Specify width |
| Height | CSS - Indication of height |
| Style |
|
| CSS | Specification of CSS properties for the field. Deactivated when Standard is selected beforehand.
All CSS properties except "url" are allowed. The following characters are prohibited: "\", "/", "?", "<" and ">"
|
| Default Style | |
| Text Input | CSS specification for all input fields (HTML input) |
| Select | CSS specification for all selection fields (HTML select) |
| Error Output | |
| Error Output Active | Specifies whether card payment errors are to be specified in the checkout. |
| Error Output Active (Language) | Select the language in which the error message should be returned. |
With this payment method, careful selection of the authorization method is particularly important. Since with "Authorization" the demand is written immediately on the PAYONE platform, the platform also immediately sends a corresponding invoice. You should therefore use this authorization method above all if you perform the service immediately.
Editing the Orders
Orders placed via the PAYONE Extension for WooCommerce are listed as usual in the order overview of WooCommerce. Order processing differs depending on the authorization method used to process the order.
Capture
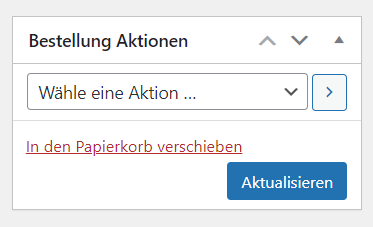
Orders placed using the authorization method "Preauthorization" are given the status "On Hold" after the order has been placed.

Only a status change to "Processing" activates the claim on the PAYONE platform and initiates (where possible) the collection of funds. Set the status to "Processing" and click on the blue "Update" button on the right.
The collection is then initiated on the PAYONE platform and acknowledged in the order notes:

Possible errors can also be found in the Order Notes.
- Credit card - 7 days (sometimes longer, varies from bank to bank)
- PayPal - 29 days
- PAYONE Secure Purchase on Account - 28 Days
Refund
Credit notes use the familiar WooCommerce credit note process. A click on the button "Refund" in the order opens the menu for credit notes:
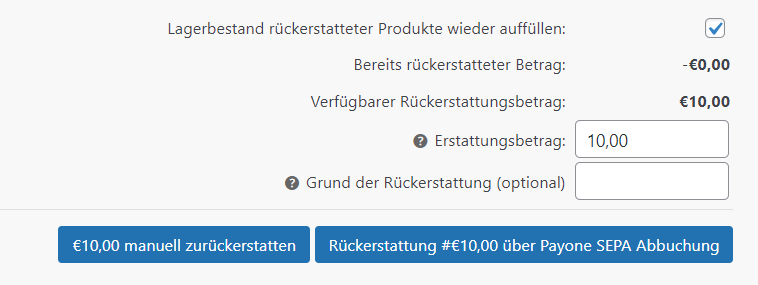
Here you can enter the amount credited and a reason. Important: "Refund manually" does not credit the money on the payment method, but only in WooCommerce. Use this option only if you do not want to transfer money back or if you use other ways than the PAYONE platform.
Extended Configurations
Here you will find separate setting options that allow you to customize our plugin more precisely to your needs.
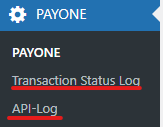
API Log
Under "API-Log" you will find the detailed API calls that WooCommerce sends to the PAYONE platform. Here you will also find detailed technical information on the response to the PAYONE API.
Transaction Status Log
The Transaction Status Log displays all feedback on payments made that the shop receives from the PAYONE API.
It is important that the Permalink settings under Settings → Permalinks are not set to "Plain".
Common Problems and Solutions
Problem: Payments are not being processed
- Check the API settings in the PAYONE admin area
- Ensure that the TransactionStatus URL is correctly configured
- Check the API logs for error messages
Problem: Credit card iFrames are not displayed
- Check the CSS settings for the iFrames
- Ensure that no "url" properties are used in the CSS settings
- Check the browser console for JavaScript errors
Problem: Transaction status is not received
- Check the TransactionStatus URL in the PMI
- Ensure that the permalink settings are correct
- Check the transaction status log for incoming messages