Integration
- Integration
- Plugins
- Integration Guide Shopware 6
- Integrationsanleitung Shopware 6
- Integration Guide Magento 2
- Integrationsanleitung Magento 2
- Integration Guide Shopware 5
- Integrationsanleitung Shopware 5
- Integration Guide WooCommerce
- Integrationsanleitung WooCommerce
- Integrationsanleitung Oxid 6
- Integration Guide Oxid 6
- Integrationsanleitung Oxid 7
- Integration Guide Oxid 7
- Installationsanleitung Magento 1
- Integration Guide Magento 1
- Channel-Server-API
- Server API - Preauthorization
- Server API - Authorization
- Server API - Capture
- Server API - Refund
- Server API - Debit
- Server API - Managemandate
- Server API - Getinvoice
- Server API - Getfile
- Server API - Vauthorization
- Server API - Creditcardcheck
- Server API - Getuser
- Server API - Updateuser
- Server API - 3dscheck
- Server API - Bankaccountcheck
- Server API - Addresscheck
- Server API - Createaccess
- Server API - Updateaccess
- Server API - Updatereminder
- Server API - General Interface Definitions
- Server API - checkout demo app
- Channel-Client-API
- Client API - Preauthorization
- Client API - Authorization
- Client API - Creditcardcheck
- Client API - Managemandate
- Client API - General Interface Definitions
- Client API - Createaccess
- Client API - Vauthorization
- Client API - Bankaccountcheck
- Client API - AJAX-Mode
- Client API - Redirect-Mode
- Client API - Addresscheck
- Client API - Hosted iFrame Mode
- Client API - Calculation of the HASH value
- PAYONE Link
- Channel-Frontend
- Response Handling
- Testdata
- NEW Hosted Tokenization Form
- Plugins
Introduction
Our OXID 7 plugin is regularly updated and provides a versatile, ready-to-use solution for easy online payment acceptance.
Supported Payment Methods
💳 Credit Cards
- Visa, Mastercard, American Express
- JCB, Diners Club, Carte Bleue (Click to Pay)
📱 Digital Wallets
- Apple Pay
- PayPal and PayPal Express
- PayPal v2 and PayPal Express v2
- Alipay
- WeChat Pay
🏦 PAYONE Solutions
- PAYONE Secure Invoice
- PAYONE Secured Payments
- PAYONE Direct Debit
- PAYONE Open Invoice
- PAYONE Prepayment
🌍 Local Payment Methods
- Klarna Payments
- Ratepay Solutions
- Unzer Payments
- Bancontact, EPS, iDEAL
- PostFinance, Przelewy24
- WERO
Requirements
Plugin Installation
You have 2 options to install our plugin:
Installation via Composer
OXID 7 uses Composer for dependency management, so our extension is also installed via Composer. Please follow these steps to install the extension:
SSH into the directory of your OXID composer.json file and run the following command:
Installation via GitHub
Download the latest version directly from GitHub and install it manually in your OXID 7 installation.
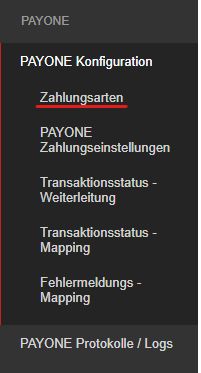
Portal Configuration
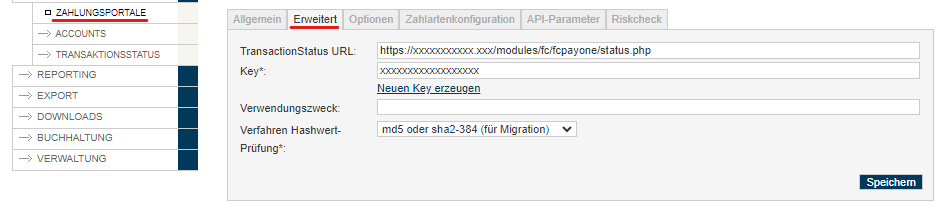
To send the transaction status to the correct address, please log in to the PAYONE Merchant Interface (PMI).
Navigate to: Configuration → Payment Portals → YOUR_PORTAL → Advanced → TransactionStatus URL
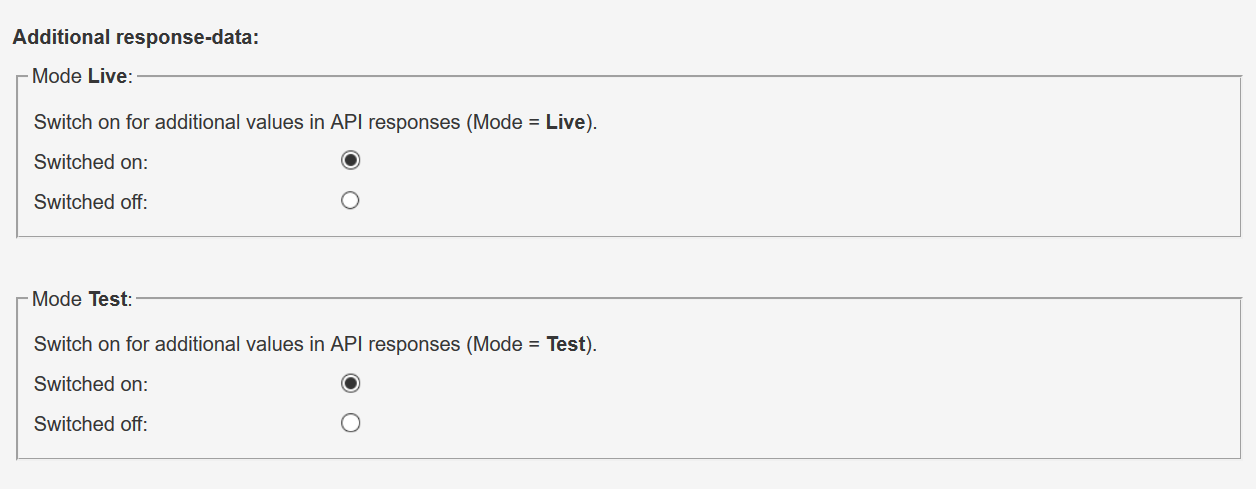
Additional Response Data
Under General, set the Additional Response-data to "on" for both Live and Test.
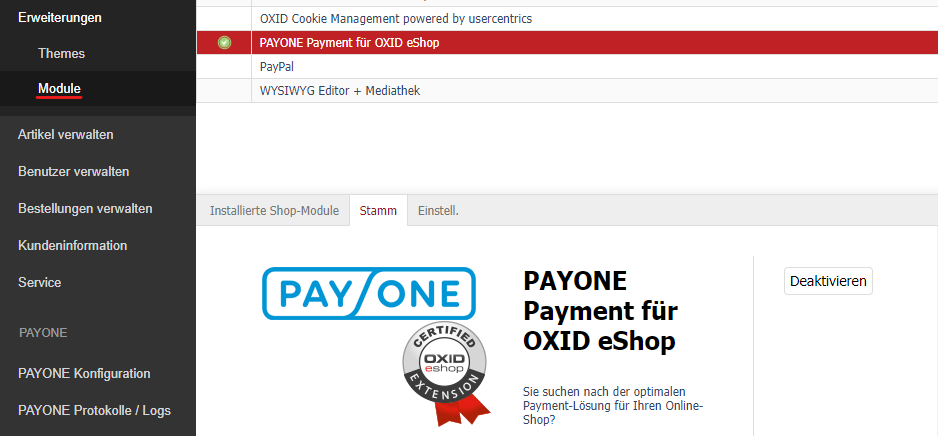
Admin Configuration
Activate the module in the OXID backend.
Payment Methods Configuration
Under Configuration → Payment Methods, the standard payment methods and PAYONE payment methods are displayed. Here you can configure the desired payment methods.
The PAYONE payment methods extend the OXID standard payment methods. To display only the PAYONE payment methods, use the filter function.

Overview
The overview shows you all PAYONE payment methods available for configuration. Please configure only the payment methods that have been activated for your merchant account.
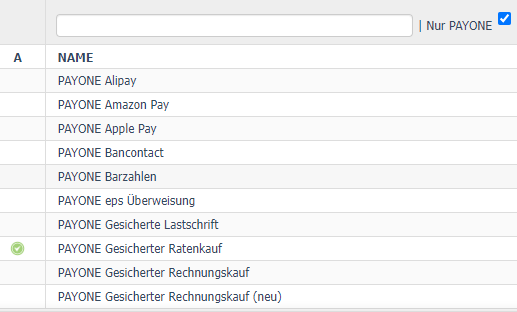
You can recognize all PAYONE payment methods by the displayed logo.
| Field | Description |
|---|---|
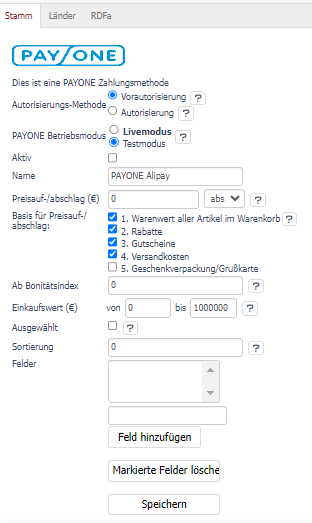
| Authorization Method | Pre-authorization - The amount to be paid is reserved. In this case, the debit must be captured in a second step during shipping. Authorization - The amount to be paid is immediately debited when the order is placed. The claim is immediately posted on the PAYONE platform. |
| PAYONE Operating Mode | Determines for the respective payment method whether payments should be processed in test mode or executed "live". |
| Active | Determines whether the payment method is available in the checkout process. |
| Name | Name of the payment method displayed in the checkout. |
| Price Surcharge/Discount | abs - specifies the absolute price (e.g., 7.50 = 7.50 Euro) % - calculates the price in relation to the cart value (e.g., 2 = 2% of cart value). You can also enter negative values. |
| From Credit Rating Index | Here you can specify that certain payment methods are only available to users/buyers who have at least the defined credit rating index. You can set the credit rating index for each user under Manage User → User → Advanced. |
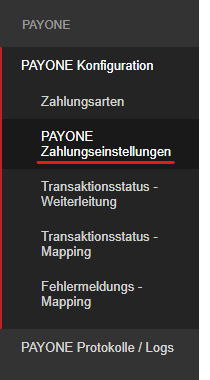
The global configuration settings for communication with the PAYONE platform are made under PAYONE → Configuration → PAYONE Payment Settings.
Connection Settings
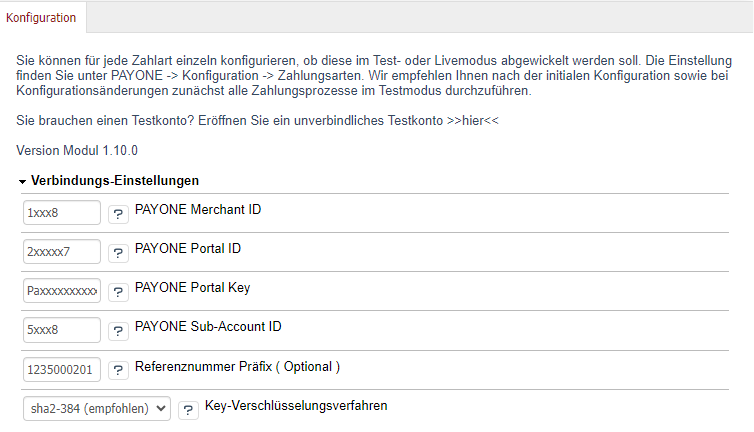
| Field | Description |
|---|---|
| PAYONE Merchant ID | You can find your PAYONE Merchant ID in the top right of the PAYONE Merchant Interface (PMI) and on all PAYONE invoices. |
| PAYONE Portal ID | You can find the Portal ID in the PAYONE Merchant Interface (PMI) under the menu item Configuration → Payment Portals |
| PAYONE Portal Key | You can find the Portal Key in the PAYONE Merchant Interface (PMI) under Configuration → Payment Portals → [Edit] → Tab [Advanced] → Key |
| PAYONE Sub-Account ID | You can find the ID in the PAYONE Merchant Interface (PMI) under the menu item Configuration → Accounts |
| Reference Number Prefix | Here you can configure how the reference number should be supplemented to ensure uniqueness when transferring to PAYONE. |
| Hash Method | This setting corresponds to the hash setting in your payment portal. The PMI and shop settings must match for credit card payments to work correctly. We strongly recommend setting both to sha2! |
General

| Field | Description |
|---|---|
| Send Item List | Here you can set that item information is also transmitted to PAYONE. This option only needs to be activated if you have booked the invoicing module with PAYONE. |
| Save Order Before Authorization | Here you can specify whether the order is saved before payment confirmation. These orders are then in a waiting status. |
Special Customizations
The credit card payment method is divided into different subtypes (card brands) in the extension. In the overview, you can activate or deactivate the respective card type. You also have the option to assign countries to the respective card brand from which you want to accept the card. Additionally, you can set for each credit card brand whether it is activated in live or test mode.

Credit Card Configuration
The OXID plugin provides you with compliance with the "lowest" compliance level according to PCI DSS (SAQ A). Since in this compliance level all credit card data may only be entered into fields hosted by a PCI DSS certified service provider, our extension uses iFrames that are integrated into the checkout. However, these do not inherit the CSS of the shop template but contain their own style. You can use the following settings to customize these fields.
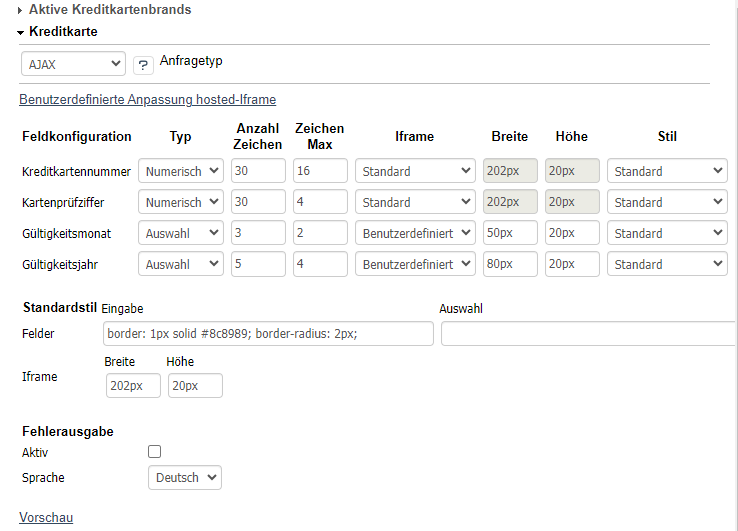
| Field | Description |
|---|---|
| Request Type |
Make sure you always use "hosted iFrame". Only merchants with a PCI DSS certification level of SAQ A-EP or higher may use AJAX.
|
| Field Configuration | Here you can set separate parameters for the individual fields of the credit card query. |
| Type | Numeric - Only numbers are allowed and the numeric keyboard is used for mobile devices input type="tel". Password - input type="password" Text - input type="text" Selection - drop-down list |
| Number of Characters | Number of characters in the width of the input field |
| Max Characters | Maximum allowed number of characters |
| Iframe | Standard - Uses width and height from default styles Custom - Uses width and height from the following fields |
| Width | Set the width in CSS |
| Height | Specify the height in CSS |
| Style | Standard - Uses CSS specification from default Custom - Uses CSS specification from the following fields |
| CSS | Specify the CSS to format the respective field.
If you use the CSS attribute "url", the respective field will not be displayed
|
| Default Style | |
| Fields | Input - CSS specification for all input fields (HTML input) Selection - CSS specification for all selection fields (HTML select) |
| Iframe | Width - CSS specification Height - CSS specification |
| Error Output | |
| Active | Activates the output of error messages in the checkout for credit card payments. |
| Language | Select the language in which the error message should be output. |
In the direct debit section, you can make settings regarding the SEPA procedure (Single European Payments Area).
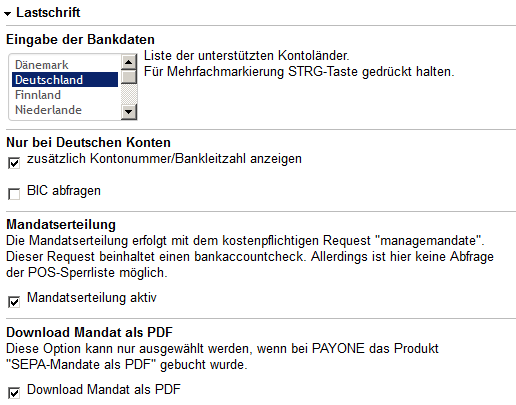
| Field | Description |
|---|---|
| Countries | Selection of countries for which the direct debit procedure can be offered. |
| Only for German Accounts | For German accounts, it is still possible to display the account number and bank code in addition to IBAN / BIC. With this selection you activate the display. |
| Mandate Issuance | Should the SEPA mandate manager be used? A check of the bank connection is mandatory. |
| Download Mandate as PDF | If you select Yes, a link is offered after the order through which the end customer can download the SEPA mandate as a PDF file.
This product must be ordered separately.
|
| Field | Description |
|---|---|
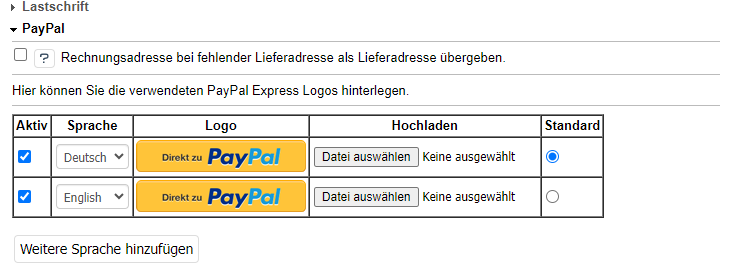
| Use Billing Address as Shipping Address | If no explicit shipping address or a different shipping address was specified, the billing address is transmitted as the shipping address for the PayPal payment method - provided the checkbox is activated. |
| Active | Activates the entry |
| Language | Language for which this entry applies. Only languages created in the OXID eShop are displayed. |
| Logo | Preview of the uploaded logo that will later be used in the checkout. |
| Upload | At this point the logo can be selected. |
| Default | If activated, the entry or logo of this entry is used as default for all languages for which no logo is available. |
| Field | Description |
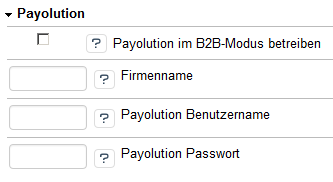
|---|---|
| Operate in B2B Mode | If B2B mode is activated, it is automatically assumed that it is a B2B transaction if the "Company" field was filled in when entering the address. To check the creditworthiness of the company, additional information such as the commercial register number is then requested in the checkout. |
| Company Name | Here the full name of the company must be specified. The name is used in the privacy policy. |
| Unzer Username | To retrieve the installment purchase contract draft, the username assigned by Unzer must be stored here. |
| Unzer Password | Here the password assigned by Unzer must be stored to retrieve the installment purchase contract. |
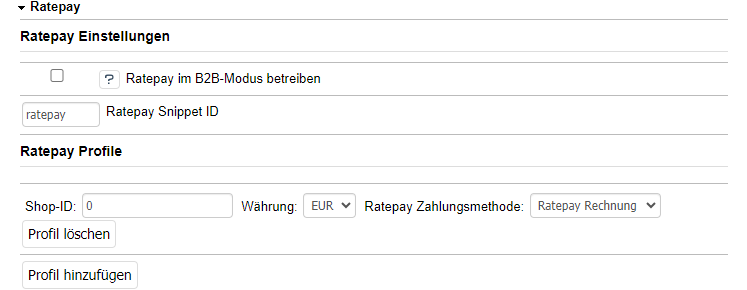
For Ratepay to work, please add your profile ID and specify the corresponding currency.
If B2B mode is activated and the company name is provided by the user, the VAT identification number is requested. For B2C customers, the date of birth is requested instead.
These two payment methods require their own payment portal. Please enter a separate Portal ID under Configuration → Payment Methods → PAYONE Secured Invoice Purchase or PAYONE Secured Installment Purchase.
Advanced Configurations
Here you will find separate configuration options to customize our plugin more precisely to your needs.
Under PAYONE → Protect you can configure both credit and address checks as well as bank account checks.

Here you can specify for the credit check whether the checks should be performed in test or live mode.
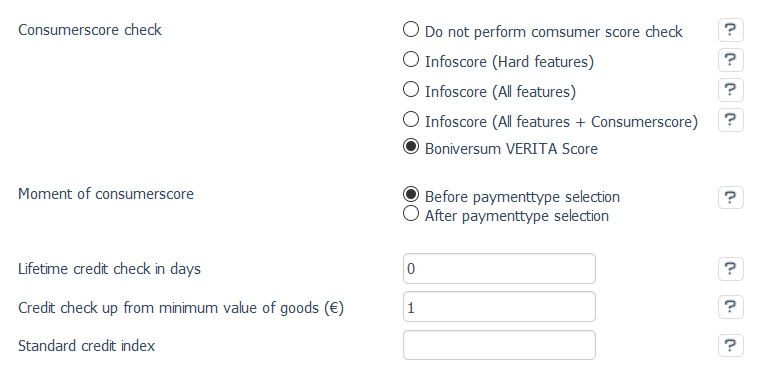
Credit Check
Here you can specify whether and in what form a credit check should be performed during the ordering process.
| Field | Description |
|---|---|
| Credit Check | No credit check - No request is made to the PAYONE platform Infoscore (Hard Features) - Check for hard features via Infoscore (e.g., consumer insolvency proceedings, arrest warrant to enforce affidavit or execution of affidavit) Infoscore (All Features) - Check for so-called "hard" negative features (see above) and "medium" negative features (e.g., dunning notice, enforcement order or foreclosure) and "soft" negative features (e.g., dunning procedure initiated, continuation of extrajudicial dunning procedure after partial payment, discontinuation of extrajudicial dunning procedure due to hopelessness) Infoscore (All Features+Boniscore) - Check for all features (see above) and delivery of the Boniscore, which as a score value enables higher sensitivity for existing negative features. Boniverse VERITA Score - Check for VERITA-Scores via Boniversum |
| Moment of Credit Check | Before payment method selection After payment method selection - You can select the credit index for the payment method so that a check is only performed for certain payment methods. |
| Credit Check Lifetime in Days | Number of days for which the returned credit value is valid. Until the set period expires, no new credit checks are performed for the relevant shop buyer/user. If this field is empty, a request is always made. |
| Credit Check from Cart Value (€) | Cart value from which a credit check is performed. If this field is empty, a request is always made. |
| Default Credit Index | Purpose: If the customer has not yet been checked and the check only takes place from a certain cart value, this is the credit index that is considered until the first actual check. If this field remains empty, the OXID default is set (1000). |
Address Check
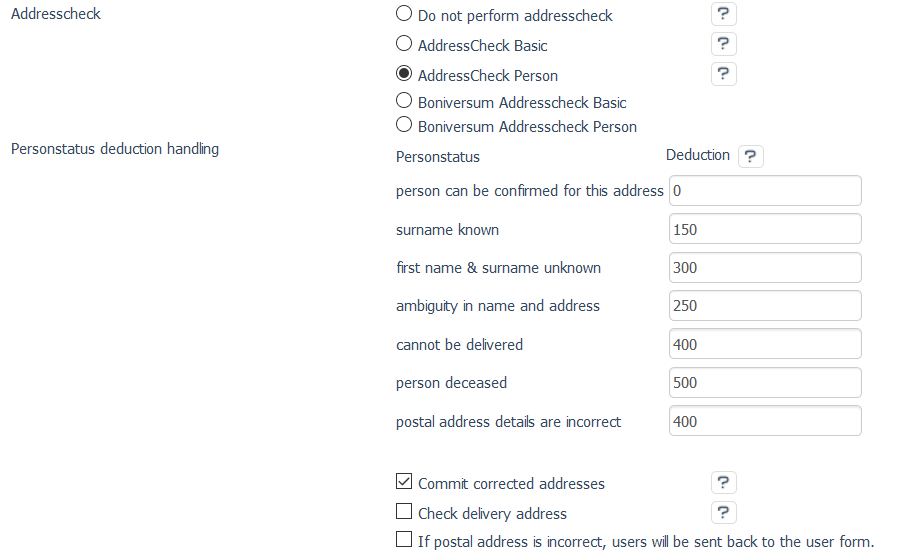
Here you can specify whether and in what form address checks should be performed and how the OXID eShop should behave when certain results apply.
| Field | Description |
|---|---|
| Address Check | No address check - No address check is performed AddressCheck Basic - Address check for existence (street, postal code, city, country) as well as address completion and correction (possible for addresses from Germany, Austria, Switzerland, Netherlands, Belgium, Luxembourg, France, Italy, Spain, Portugal, Denmark, Sweden, Finland, Norway, Poland, Slovakia, Czech Republic, Hungary, USA, Canada). AddressCheck Person - Check whether the person is known at the specified address, check for the existence of the address and completion and correction of the address (Germany only). Boniversum Addresscheck Basic Boniversum Addresscheck Person |
| Apply Corrected Addresses | An address corrected by the PAYONE platform is adopted. |
| Check Delivery Address | A different delivery address is also checked based on the selected address check.
If the "Apply corrected addresses" option is selected, the corrected delivery addresses are also applied.
|
| If Address is Postally Incorrect, User is Sent Back to User Form | If the described condition applies, the user is prompted again in the checkout to enter their billing/delivery data. |
Bank Connection Check
Here you can set whether and in what form the bank connection should be checked for the direct debit payment method during the ordering process.

| Field | Description |
|---|---|
| Bank Connection Check | Disabled - No check of the bank connection takes place Enabled - The system checks the plausibility of the account data. The existence of the bank connection or account coverage is not checked.
Enabled, with check against POS blacklist - A check of the bank connection for plausibility and a check against the POS blacklist is performed.Here too, no check is made for the existence of the bank connection or account coverage. The POS block file contains account connections with open chargebacks from stationary retail.
|
| Field | Description |
|---|---|
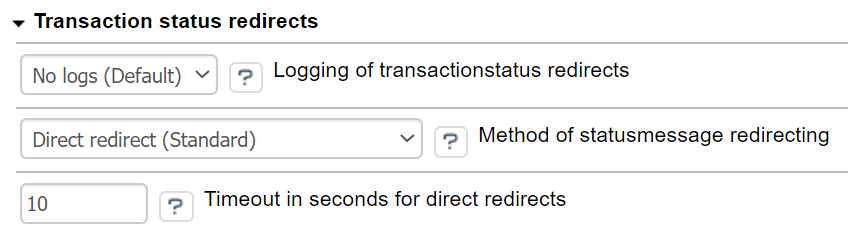
| Logs | If this option is activated, you can log the activity of transaction status forwarding. The content of this logging ends up in the file fcpo_message_forwarding.log in the log folder of your shop. |
| Redirection Mode | Direct Redirection - With this method, the transaction is redirected directly after receipt. This mode offers high redirection speed and moderate transaction security. Delay by Cronjob - Instead of forwarding the status message directly, this method collects incoming messages and forwards them after calling a cronjob. This mode offers very high transaction security. The speed of status message forwarding depends on your server configuration. |
| Time Limit | To offer direct redirections without interruptions, a time limit is required for the "Direct Redirections" mode. |

Transaction status forwarding allows you to pass the payment status to other systems, such as the merchandise management system.

| Field | Description |
|---|---|
| Status | The status sent by PAYONE. |
| URL | Enter the receiving URL to which the status should be forwarded. |
| Timeout | Number of seconds to wait until the status is accepted. |
| Delete | Here you can delete the respective forwarding. |
| Save | When saving, all forwardings are saved in the database. |
| Add | You can add as many forwardings as you want. Also multiple forwardings for one and the same status. |

Transaction status mapping serves to use the PAYONE status to have orders processed according to your wishes in a corresponding shop status.
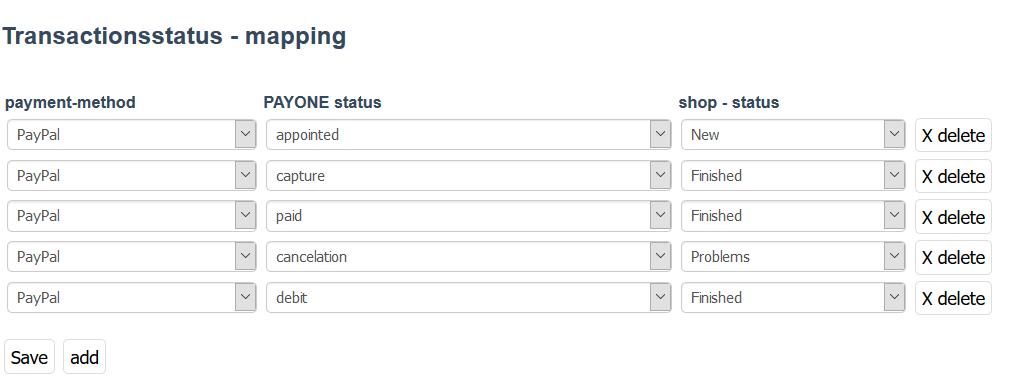
| Field | Description |
|---|---|
| Payment Method | The payment method for which the mapping should apply. |
| PAYONE Status | The status sent by PAYONE to the shop. |
| Shop Status | The status that orders should assume when the configured PAYONE request is processed in the shop. |
| Delete | Here you can delete the respective mapping. |
| Save | When saving, all mappings are saved in the database. |
| Add | You can add as many mappings as you want. However, please note that only one mapping exists for a combination of payment method and PAYONE status. This can lead to inconsistencies. |
Under PAYONE Logs you will find all information about processed payments, communication with the PAYONE platform, and the order overview.

Transactions
The Transactions submenu item shows the transaction status notifications received by the OXID eShop from the PAYONE platform for each order and transaction. In case of error, you can find out here whether the transaction status was received correctly and what the current status of a transaction is.
In the overview you see all received and processed transaction status messages from the PAYONE platform. Filter options are available above the individual columns.
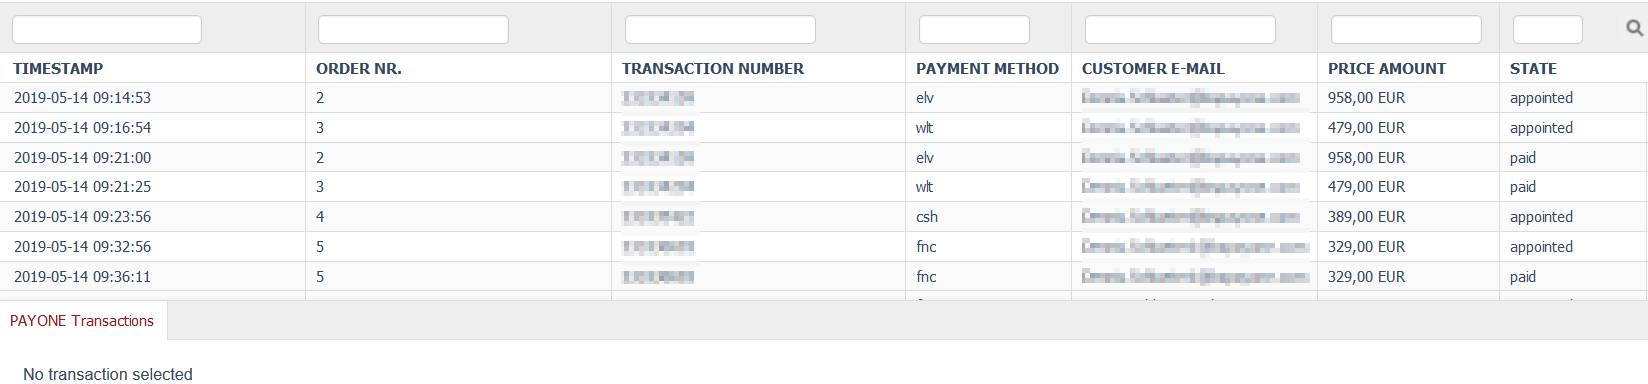
| Field | Description |
|---|---|
| Time | Time when the transaction status was received. |
| Order Number | The order number of the order in the OXID eShop. |
| Transaction Number | The unique number of the transaction (TXID). This number is assigned by the PAYONE platform. |
| Payment Method | Here the payment method used in this transaction is displayed. The following abbreviations are possible: elv - Direct Debit cc - Credit Card rec - Invoice Purchase cod - Cash on Delivery sb - Online Transfer wlt - e-Wallet (e.g., PayPal) fnc - Financing (e.g., Klarna) |
| Customer Email | The customer's email address provided during the order. |
| Amount | The amount in the currency used. |
| Status | Here the status transmitted by the PAYONE platform transaction status is displayed.
An explanation of the individual statuses can be found in the technical documentation of the PAYONE platform in the PAYONE Merchant Interface (PMI) under Downloads → Documentation.
|
Transaction Details
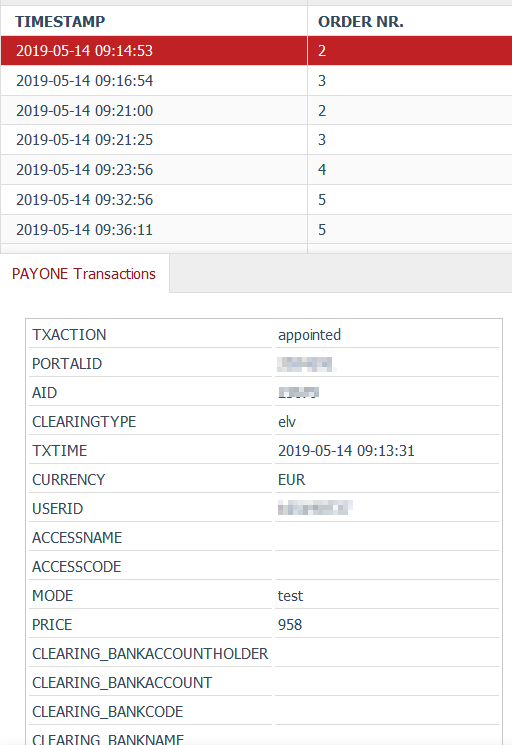
After selecting an entry in the overview, you receive all transaction status information transmitted via the PAYONE platform to your OXID eShop. This way you can always track which data your OXID eShop has received and processed.
A detailed explanation of the respective parameters can be found in the technical documentation of the PAYONE platform in the PAYONE Merchant Interface (PMI) under Downloads → Documentation.
API Logs
The only requests not included in these logs are requests that use the Client API. The reason for this is that these requests are sent directly from the buyer's browser (client) to the PAYONE platform based on Ajax technology for Payment Card Industry Data Security Standards reasons, so that your OXID eShop technically does not come into contact with sensitive credit card data.
In the overview you will find a list of all requests from the OXID eShop to the Server API with basic information. You can filter the display in the column headers by entering search terms.

The entire content of the Request and Response columns is searched. The content is described in more detail in the API log details.
| Field | Description |
|---|---|
| Time | Time of the request |
| Channel | The channel used |
| Request | Type of request |
| Response | Parameter "status" from the PAYONE platform's response to the request |
API Log Details

If you click on one of the requests listed in the overview, you will see all parameters of the request sent to the PAYONE platform as well as the corresponding response from the PAYONE platform.
Orders
Via the menu item Manage Orders → Orders, which is available by default in every OXID eShop, the same overview including the PAYONE tab is displayed as under PAYONE → Logs → Orders.
In the overview you will find a list of all orders with basic information. As with transactions and API logs, you can filter the display in the column headers by entering search terms.

| Field | Description |
|---|---|
| Order Time | Time of the order |
| Paid | Time of payment notification via the PAYONE platform. |
| Order No. | Order number of the OXID eShop. |
| First Name, Last Name | Customer name |
| PAYONE Ref. No. | The reference number passed to the PAYONE platform for unique identification. The reference number is stored in the "Reference" parameter. |
PAYONE Tab
In the PAYONE tab you will find the transaction account in the context of the order, in which all claims and payments are displayed. This is based on the requests from OXID eShop via the Server API to the PAYONE platform as well as the transaction status feedback from the PAYONE platform.
You also have the option to capture payments for pre-authorized payment processes and refunds.

| Field | Description |
|---|---|
| Reference Number | The reference number passed to the PAYONE platform for unique identification. The reference number is stored in the "Reference" parameter. |
| PAYONE Transaction Number (TXID) | The transaction number under which the transaction was processed on the PAYONE platform. |
| Payment Method | Payment method with which the order was executed. |
| Payment Details | Depending on the payment method, detailed payment information is listed here. For credit card payments, the card type and masked card number fields are displayed as information. |
| Amount | Depending on the payment status of the order, you can trigger a refund or perform a payment capture at this point.
In the receivables management in the PAYONE Merchant Interface (PMI), you have further options for performing captures, refunds, etc. In addition, you can control these transaction types via your merchandise management system and/or via the Server API of the PAYONE platform.
|
| Transaction Account | All claims and payments for the order are displayed here in the form of a transaction account. All negative amounts are displayed in red. Click on "Time" to open the corresponding transaction status. |