Integration
- Integration
- Plugins
- Integration Guide Shopware 6
- Integrationsanleitung Shopware 6
- Integration Guide Magento 2
- Integrationsanleitung Magento 2
- Integration Guide Shopware 5
- Integrationsanleitung Shopware 5
- Integration Guide WooCommerce
- Integrationsanleitung WooCommerce
- Integrationsanleitung Oxid 6
- Integration Guide Oxid 6
- Integrationsanleitung Oxid 7
- Integration Guide Oxid 7
- Installationsanleitung Magento 1
- Integration Guide Magento 1
- Channel-Server-API
- Server API - Preauthorization
- Server API - Authorization
- Server API - Capture
- Server API - Refund
- Server API - Debit
- Server API - Managemandate
- Server API - Getinvoice
- Server API - Getfile
- Server API - Vauthorization
- Server API - Creditcardcheck
- Server API - Getuser
- Server API - Updateuser
- Server API - 3dscheck
- Server API - Bankaccountcheck
- Server API - Addresscheck
- Server API - Createaccess
- Server API - Updateaccess
- Server API - Updatereminder
- Server API - General Interface Definitions
- Server API - checkout demo app
- Channel-Client-API
- Client API - Preauthorization
- Client API - Authorization
- Client API - Creditcardcheck
- Client API - Managemandate
- Client API - General Interface Definitions
- Client API - Createaccess
- Client API - Vauthorization
- Client API - Bankaccountcheck
- Client API - AJAX-Mode
- Client API - Redirect-Mode
- Client API - Addresscheck
- Client API - Hosted iFrame Mode
- Client API - Calculation of the HASH value
- PAYONE Link
- Channel-Frontend
- Response Handling
- Testdata
- NEW Hosted Tokenization Form
- Plugins
Introduction
Our Shopware 5 plugin is regularly updated and provides a versatile, ready-to-use solution for easy online payment acceptance.
Supported Payment Methods
💳 Credit Cards
- Visa (Click to Pay), Mastercard (Click to Pay)
- American Express
- JCB, Diners Club
📱 Digital Wallets
- Apple Pay
- Google Pay
- Amazon Pay (v2)
- PayPal and PayPal Express
- PayPal v2 and PayPal Express v2
- Alipay
- WeChat Pay
- WERO
🏦 PAYONE Solutions
- PAYONE Secure Invoice
- PAYONE Secured Invoice, Secured Direct Debit and Secured Installments
- PAYONE Direct Debit
- PAYONE Open Invoice
- PAYONE Prepayment
🌍 Local Payment Methods
- Klarna Payments
- Ratepay Invoice, Direct Debit and Installments
- Unzer Invoice, Direct Debit and Installments
- Bancontact, EPS, iDEAL
- PostFinance Card and E-Finance
- Przelewy24
Requirements
Plugin Installation
You have 2 options to install our plugin:
Installation directly in Shopware 5 - Admin
- Download our latest plugin from GitHub
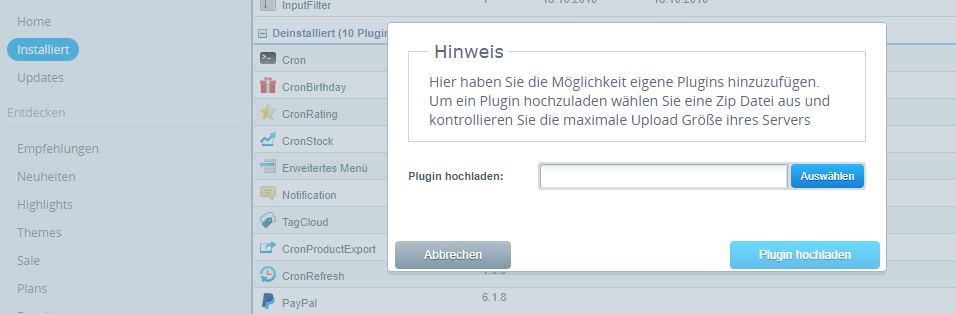
- You can upload the plugin under Settings → Plugin Manager → Installed → Upload Plugin
- Install and activate the plugin
Installation via GitHub
Download the latest version directly from GitHub and install it manually in your Shopware 5 installation.
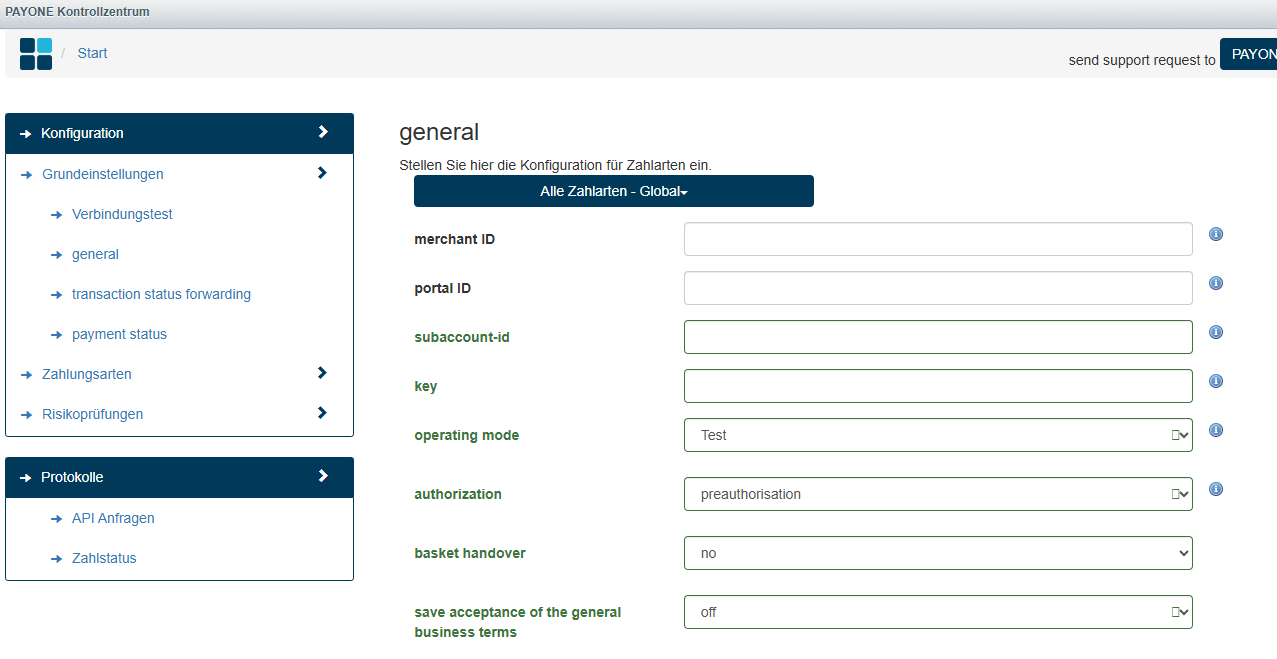
PAYONE Portal Configuration
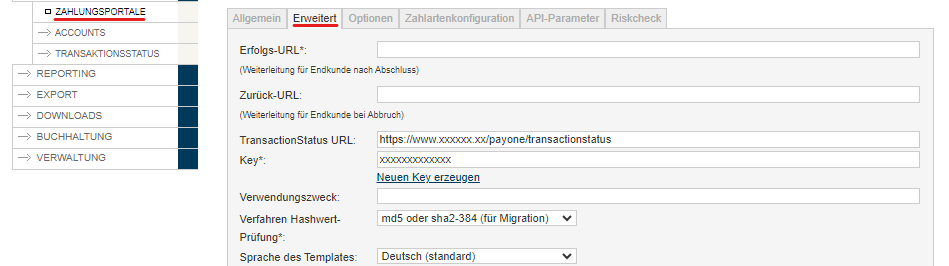
To send the transaction status to the correct address, please log in to the PAYONE Merchant Interface (PMI).
Navigate to: Configuration → Payment Portals → YOUR_PORTAL → Advanced → TransactionStatus URL
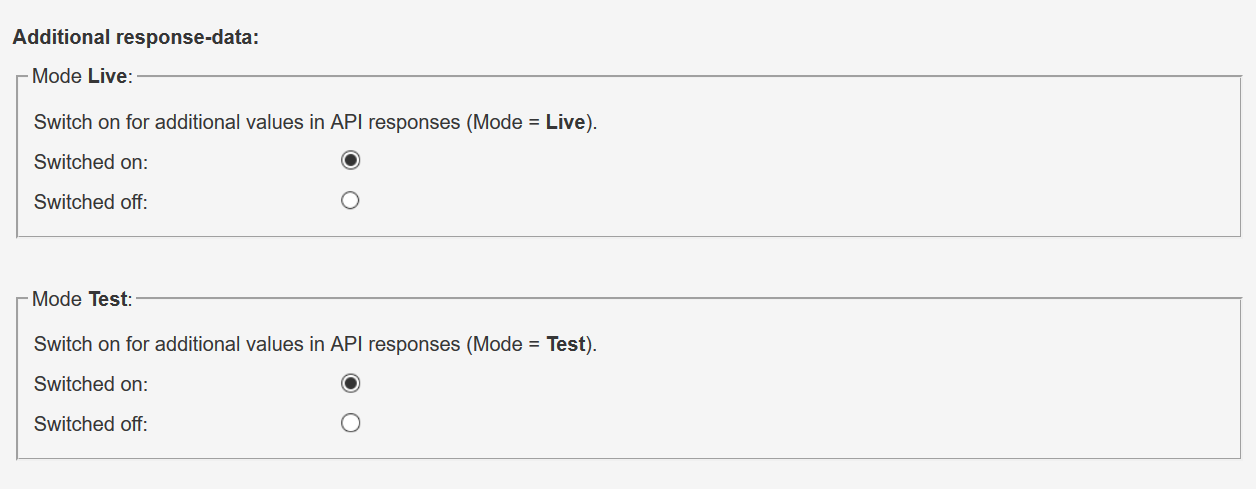
Additional Response Data
Under General, set the Additional Response data for both Live and Test modes to "on".
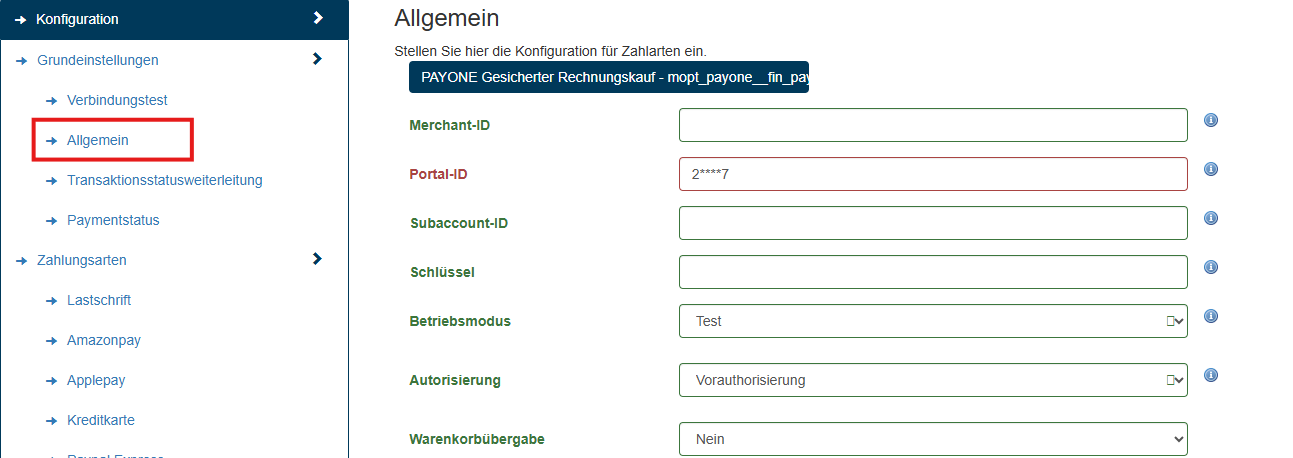
Shopware 5 Admin Configuration
Click on Customers → Payments → PAYONE Control Center → Basic setting → General
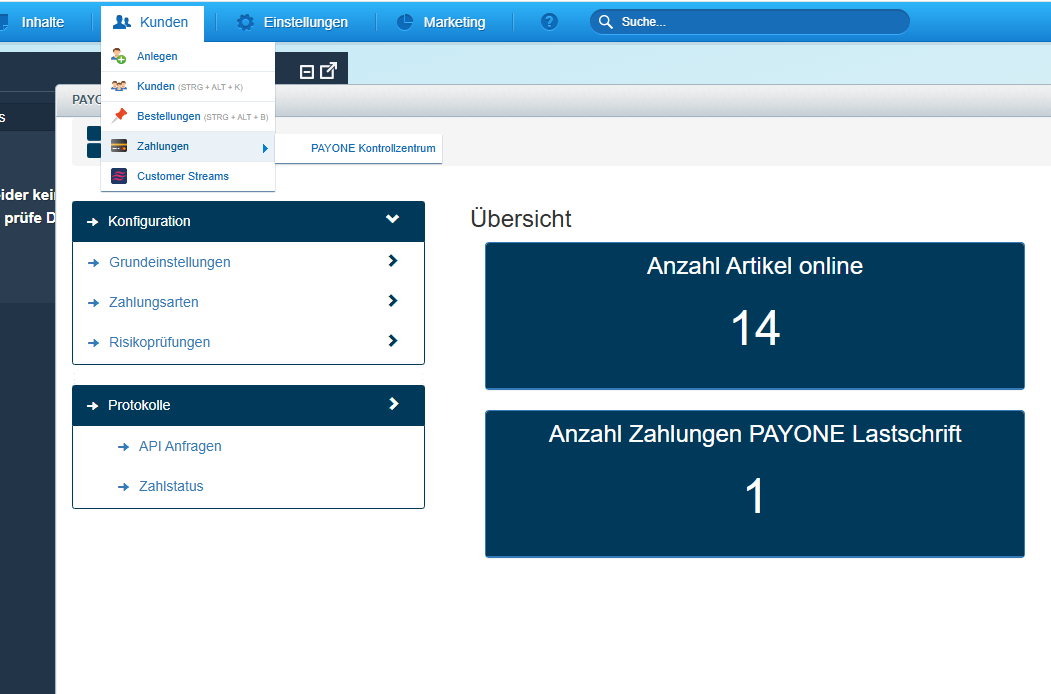
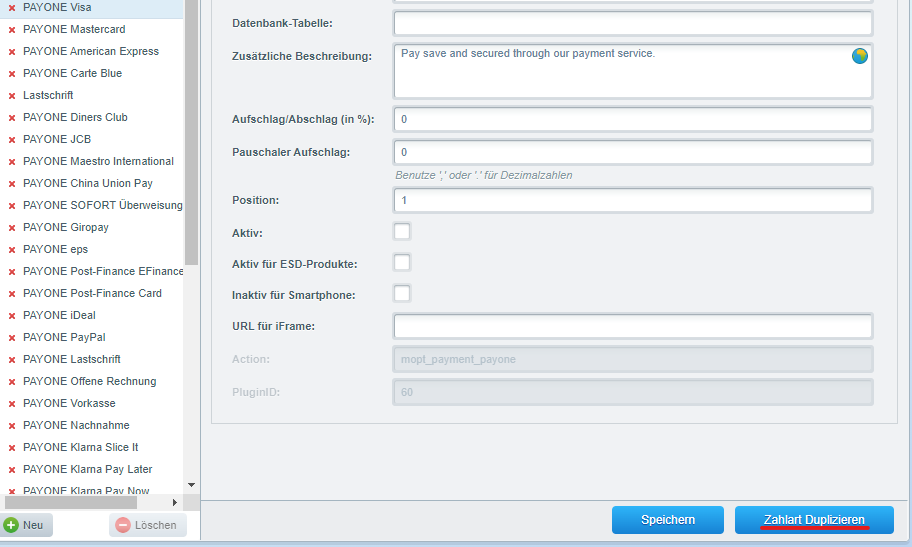
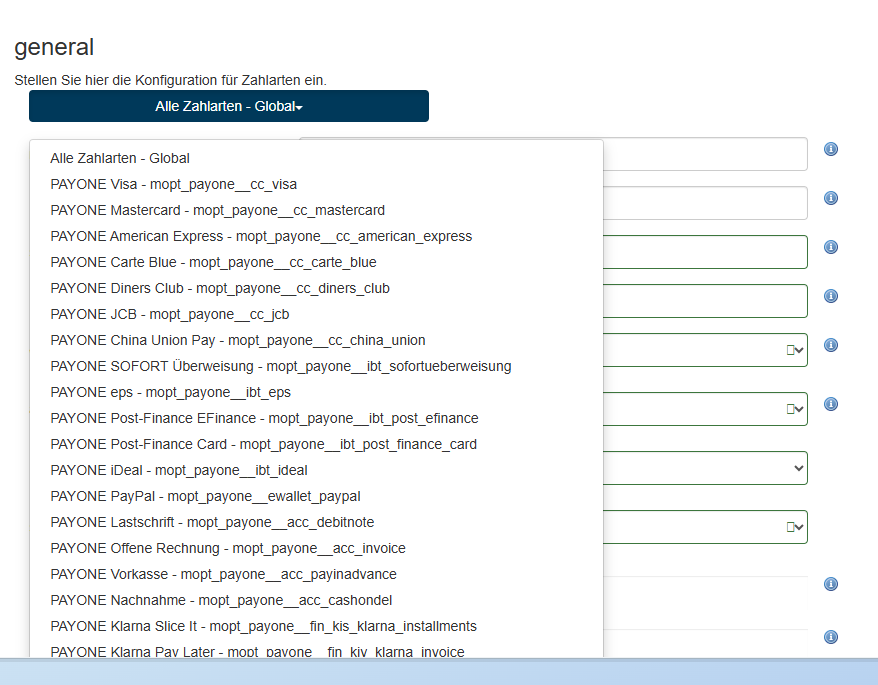
You can create a separate configuration for each payment type. The default setting - Alle (global) applies to all payment types.
Please enter your access data here:
Once you have created a separate configuration for a payment type, the default setting - Alle (global) no longer applies to the payment type.
| Field | Description |
|---|---|
| Merchant ID | You will find your PAYONE Merchant ID at the top right of the PAYONE Merchant Interface (PMI) and on all PAYONE invoices. |
| Portal ID | You can find the portal ID in the PAYONE Merchant Interface (PMI) under the menu item Configuration → Payment Portals |
| Subaccount ID | You can find the ID in the PAYONE Merchant Interface (PMI) under the menu item Configuration → Accounts |
| Key | Please enter the key here to protect the data communication against manipulation. This must be identical to the key stored in the corresponding PAYONE payment portal. |
| Operating Mode | Here you can specify for the respective payment type whether the payments are to be processed in test mode or whether they are to be executed "live". You can also configure the test mode for individual payment types. |
| Authorization | Preauthorization - The amount to be paid is reserved in the course of the order. In this case, the debit must be initiated in a second step when the goods are delivered (Capture). Authorization - The amount to be paid is collected immediately when the order is placed. The receivable is immediately booked on the PAYONE platform. |
| Basket Handover | Here you can configure whether the shopping cart information should be transferred to the PAYONE platform for each request. In most cases it's safe to leave this setting on. |
| Save Acceptance of General Business Terms | Off - Completely disables the storage of the Terms and Conditions confirmation. On the Confirm page - The storage is only activated on the confirmation page. Global - Activates the global storage setting. |
| Use Shopware Order Number | This setting causes an order number generated by the plugin to be reported as a reference to PAYONE. Note: This order number must always be unique and cannot be reused. |
| Update Order Timestamp on Notify | Updates the order change timestamp on the order when a new transaction status notification is received and processed. Note: This only works in Shopware 5.5 and higher. |
| Allow Different Shipping Addresses | For the secure payment methods offered by PAYONE, the ability to send to alternative delivery addresses must be contractually agreed upon. Only then can this option be utilized. |
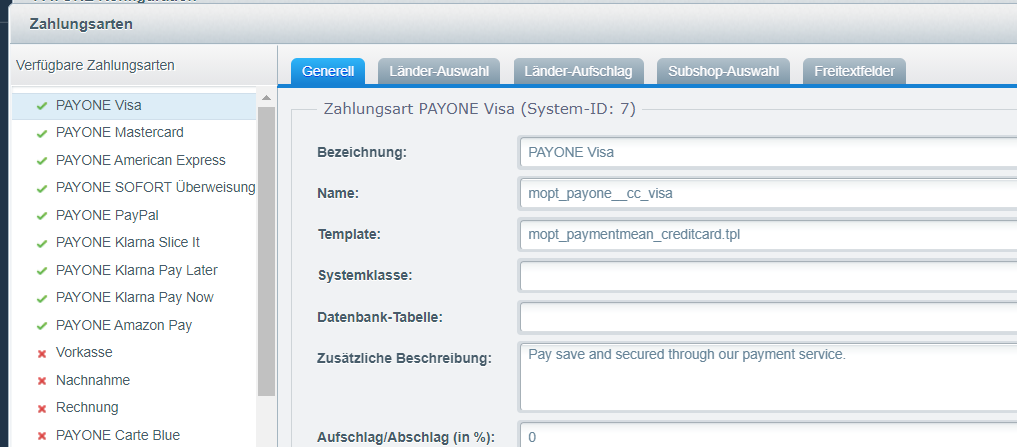
Payment Methods Setup
When you install the PAYONE plugin, all available PAYONE payment types are automatically created in your store. For easier identification, they are created with the prefix "PAYONE".
Activate the desired payment methods under Configuration → Payment Methods
Special Customizations
Some payment types require special adjustments. The next points are only interesting for you if you use the respective payment method:
Click under Customers → Payments → PAYONE Control Center → Payment methods → Direct Debit
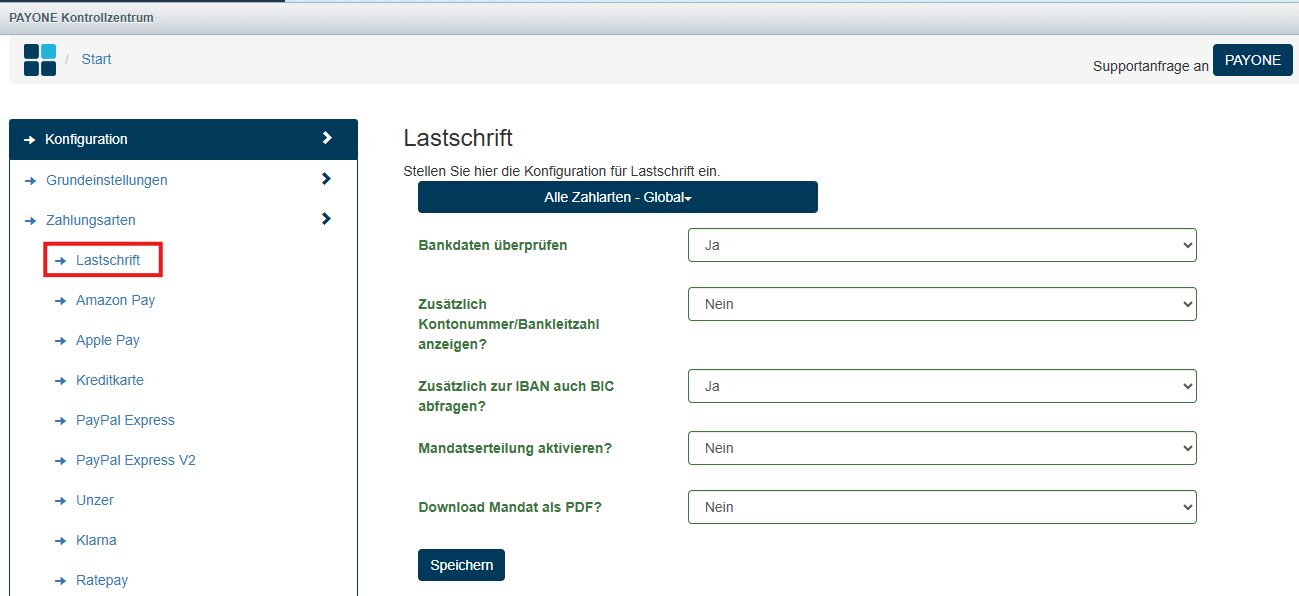
| Field | Description |
|---|---|
| Check Bank Details | Enables a verification of the bank account using the "bankaccountcheck" request. This setting is part of our optional Risk Management module. |
| Additionally Show Account Number / Bank Code | Outdated query. Today it is only of limited use. |
| In Addition to IBAN Query also BIC? | Determines whether the BIC is requested during checkout. Use this configuration for better compatibility with bank accounts outside the DACH region. |
| Activate Direct Debit Mandates? | Should the SEPA mandate manager be used? Verification of the bank account is mandatory. A check against the POS blocklist is not possible. |
| Download Mandate as PDF? | When selecting "Yes," a link will be provided after the order, allowing the end customer to download the SEPA mandate as a PDF file. |
Click under Customers → Payments → PAYONE Control Center → Payment methods → Apple Pay

| Field | Description |
|---|---|
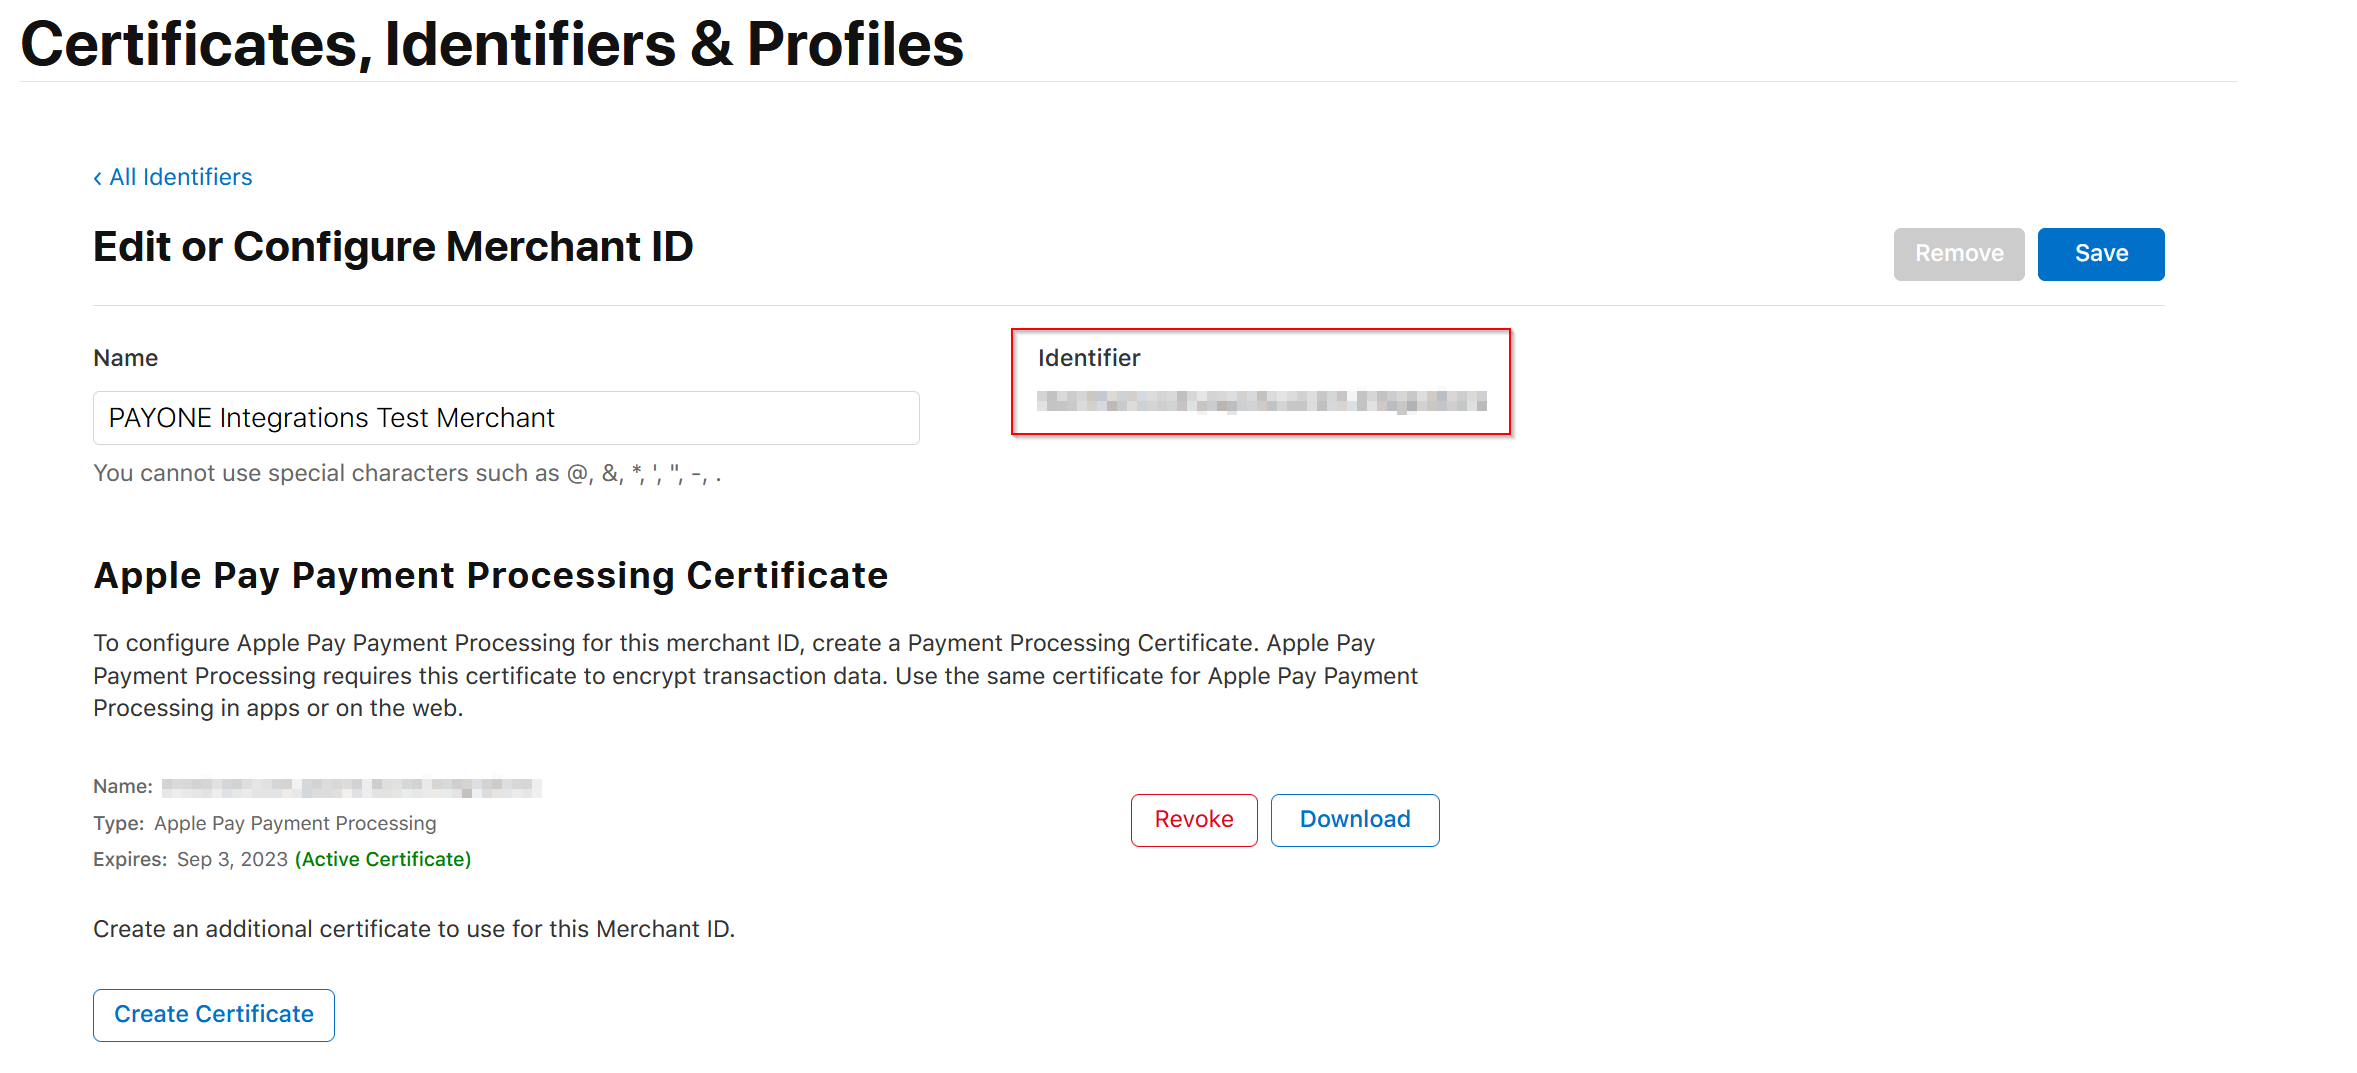
| Apple Pay MerchantId | You can retrieve this value from the Apple Developer Portal as the "Identifier" of your Merchant ID. |
| Allow Apple Pay Visa | Please specify whether Visa cards are included for Apple Pay transactions in your PAYONE agreement. |
| Allow Apple Pay Mastercard | Please specify whether Mastercard cards are included for Apple Pay transactions in your PAYONE agreement. |
| Allow Apple Pay Girocard | Please specify whether Girocard (debit card) are included for Apple Pay transactions in your PAYONE contract. |
| Apple Pay Certificate | Please upload your Apple Pay certificate here (in .pem format). Ensure that the certificate is not publicly accessible and is only readable by Shopware. |
| Apple Pay Private Key | Please upload your Apple Pay private key here (in .key format). |
| Apple Pay Private Key Password | Here you can set the password for using the private key. |
| Apple Pay Debug | If this field is enabled, debug information about the Apple Pay session will be displayed during checkout, which can help during setup. In live operation, this option should be disabled. |
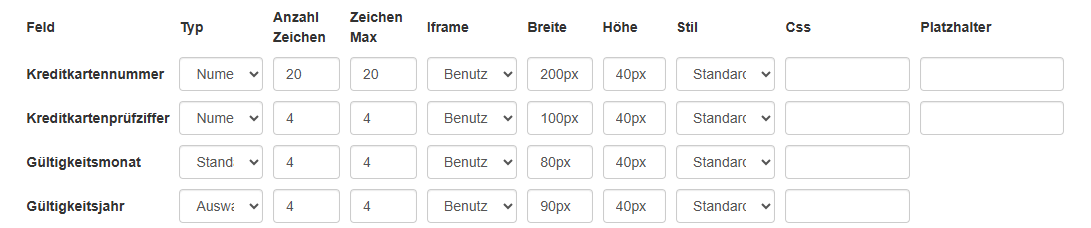
Click under Customers → Payments → PAYONE Control Center → Payment methods → Credit Card
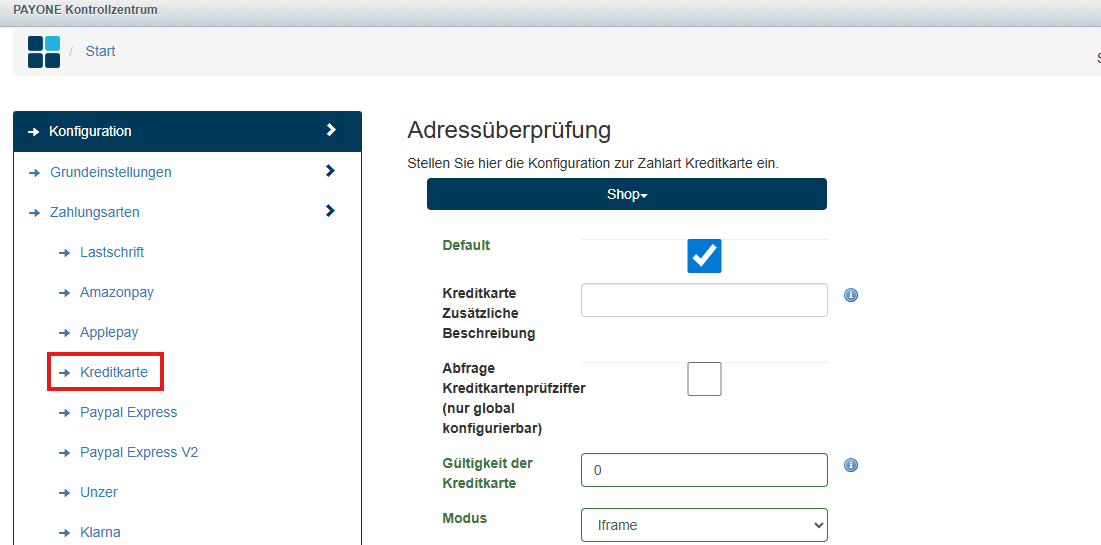
Custom Display for Hosted iFrames
Our plugin offers you compliance with the "lowest" PCI DSS compliance level (SAQ A). You can customize the iFrame fields using various styling options.

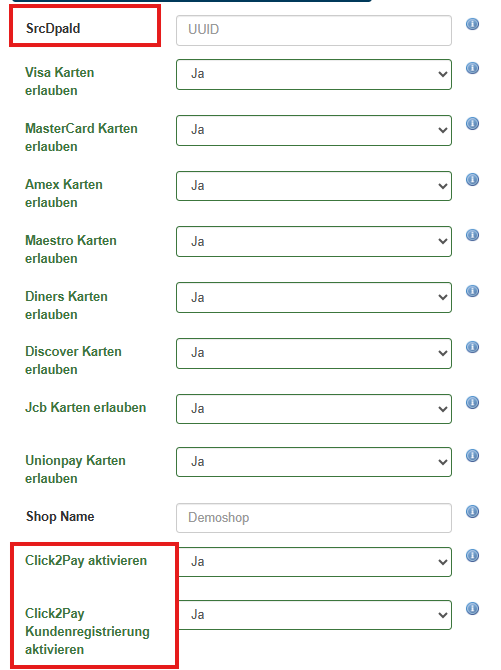
Click under Customers → Payments → PAYONE Control Center → Payment methods → Credit Card (Click to Pay)
Enter the DPA ID here. You will receive this from PAYONE. In the settings, you can enable or disable Click to Pay. You can also decide whether customers are allowed to register for Click to Pay.
Click under Customers → Payments → PAYONE Control Center → Payment methods → PayPal Express
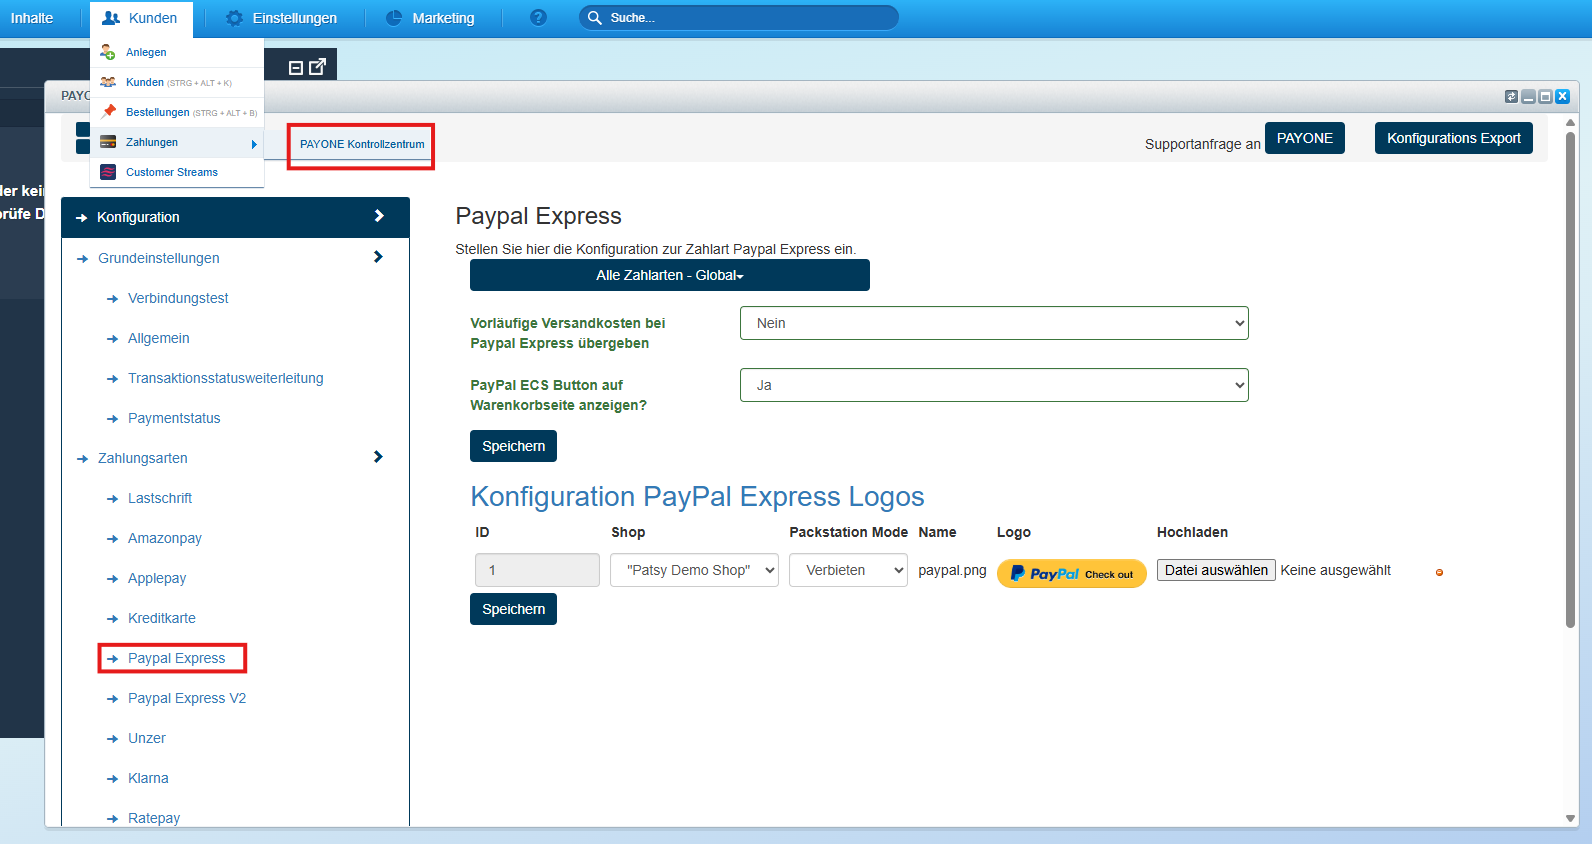
| Field | Description |
|---|---|
| Submit Pre-calculated PayPal Express Shipping Costs | No - If the shipping costs are not yet known in the shopping cart. Yes - If the shipping costs are flat-rate and can therefore be passed on. |
| Show PayPal ECS Button on Basket Page? | Yes - Button is displayed on the shopping cart page. No - Button will be hidden on the shopping cart page. |
| Configuration PayPal Express Logos | Here, the PayPal Express logo should be uploaded, and the Packstation inquiry is also configured in this section. If no image file is available, the PayPal ECS button will not be displayed in the shopping cart. |
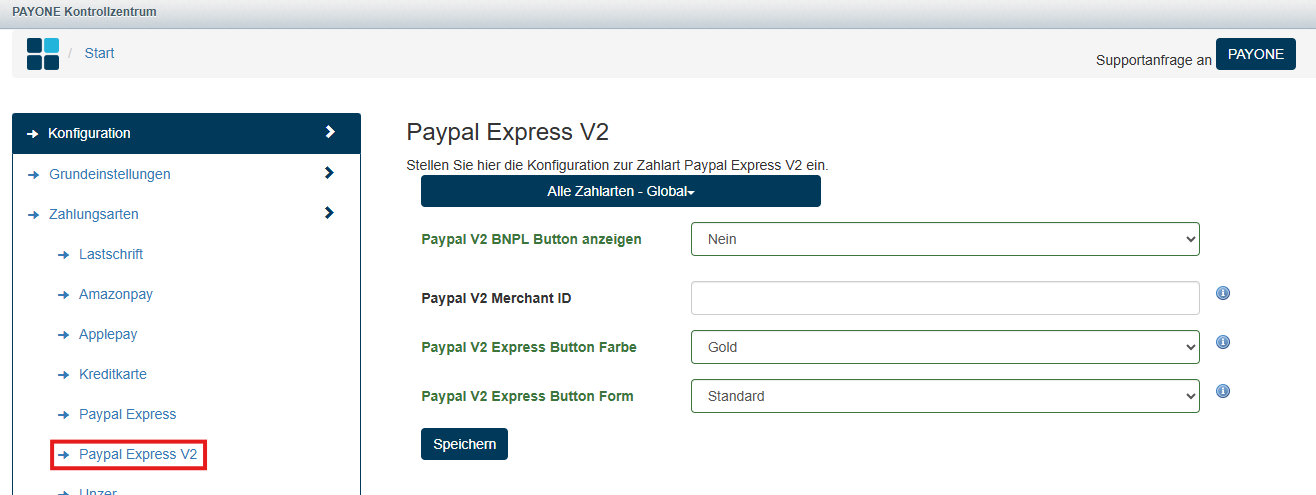
Click under Customers → Payments → PAYONE Control Center → Payment methods → PayPal Express V2

Click under Customers → Payments → PAYONE Control Center → Payment methods → Ratepay
To ensure the Ratepay payment method functions smoothly, you need to enter some additional configuration data provided by Ratepay. Use the "Add" button to add more Ratepay configurations.
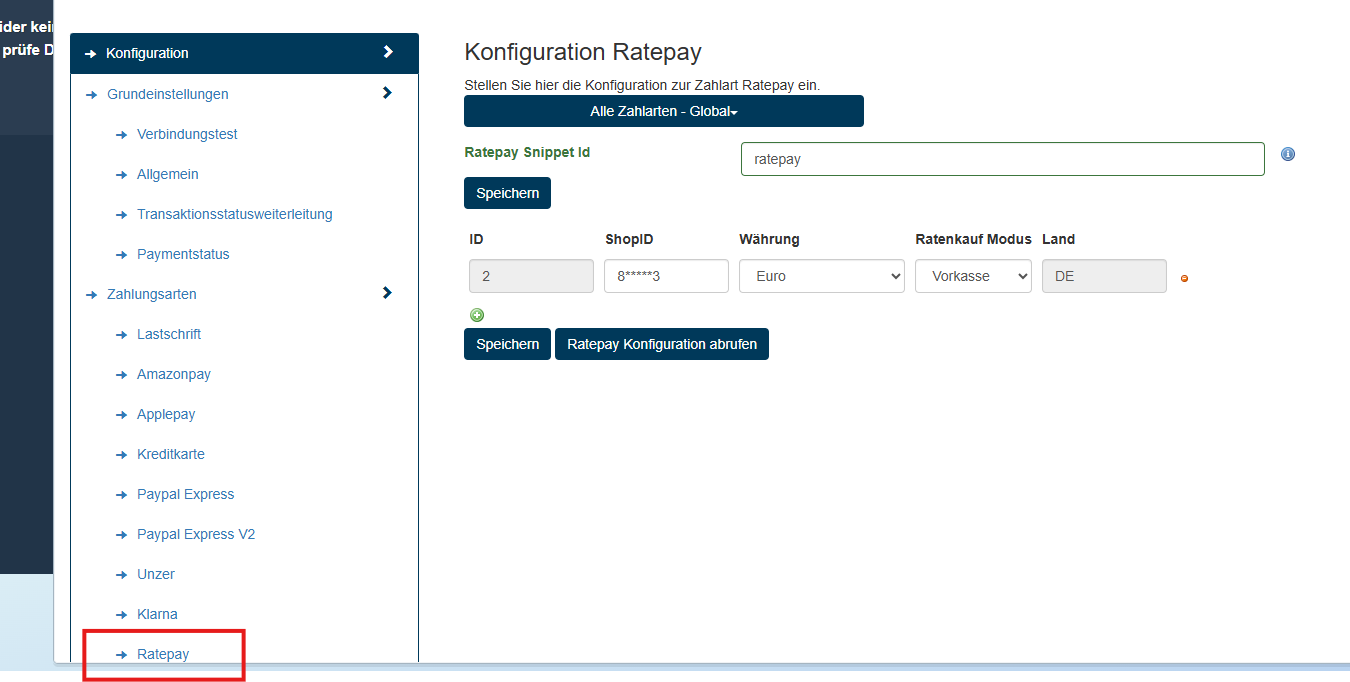
| Field | Description |
|---|---|
| ShopId | The shop ID provided by Ratepay. This represents a configuration data set (country, currency, interest rates, installment periods, etc.). |
| Currency | Currency that should be used for this shop ID. |
| Installment Mode | Prepayment - The buyer must transfer the installments to an account designated by Ratepay. Direct Debit - The installments are collected via direct debit from the buyer's account. |
Save the configuration and then retrieve the data from RatePay by clicking on "Retrieve Ratepay Configuration."
These two payment methods require their own payment portal. Please navigate to Customers → Payments → PAYONE Control Center, select the payment methods: PAYONE Secured Invoice Purchase and PAYONE Secured Installment Purchase, and enter a separate Portal ID for each.
Extended Configurations
Here you will find separate setting options that allow you to customize our plugin more precisely to your needs.
Capture
Under Customers → Orders you can enter pre-authorized orders. To do this, you need to edit the respective order by clicking on the pen.
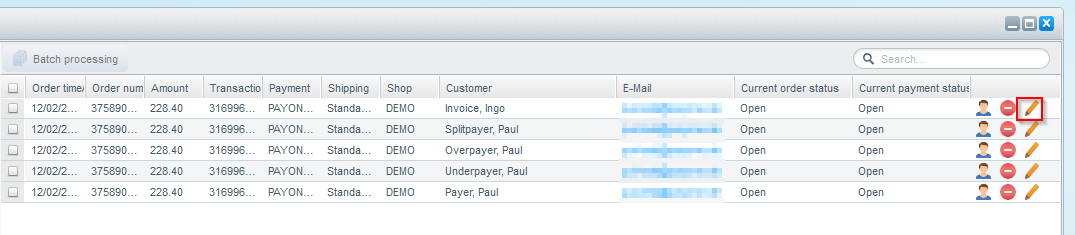
The items to be captured must be marked (checkmarked) and then confirmed with the "capture position" button.


Refund
Under Customers → Orders you can create credit notes. To do this, you need to edit the respective order by clicking on the pen.


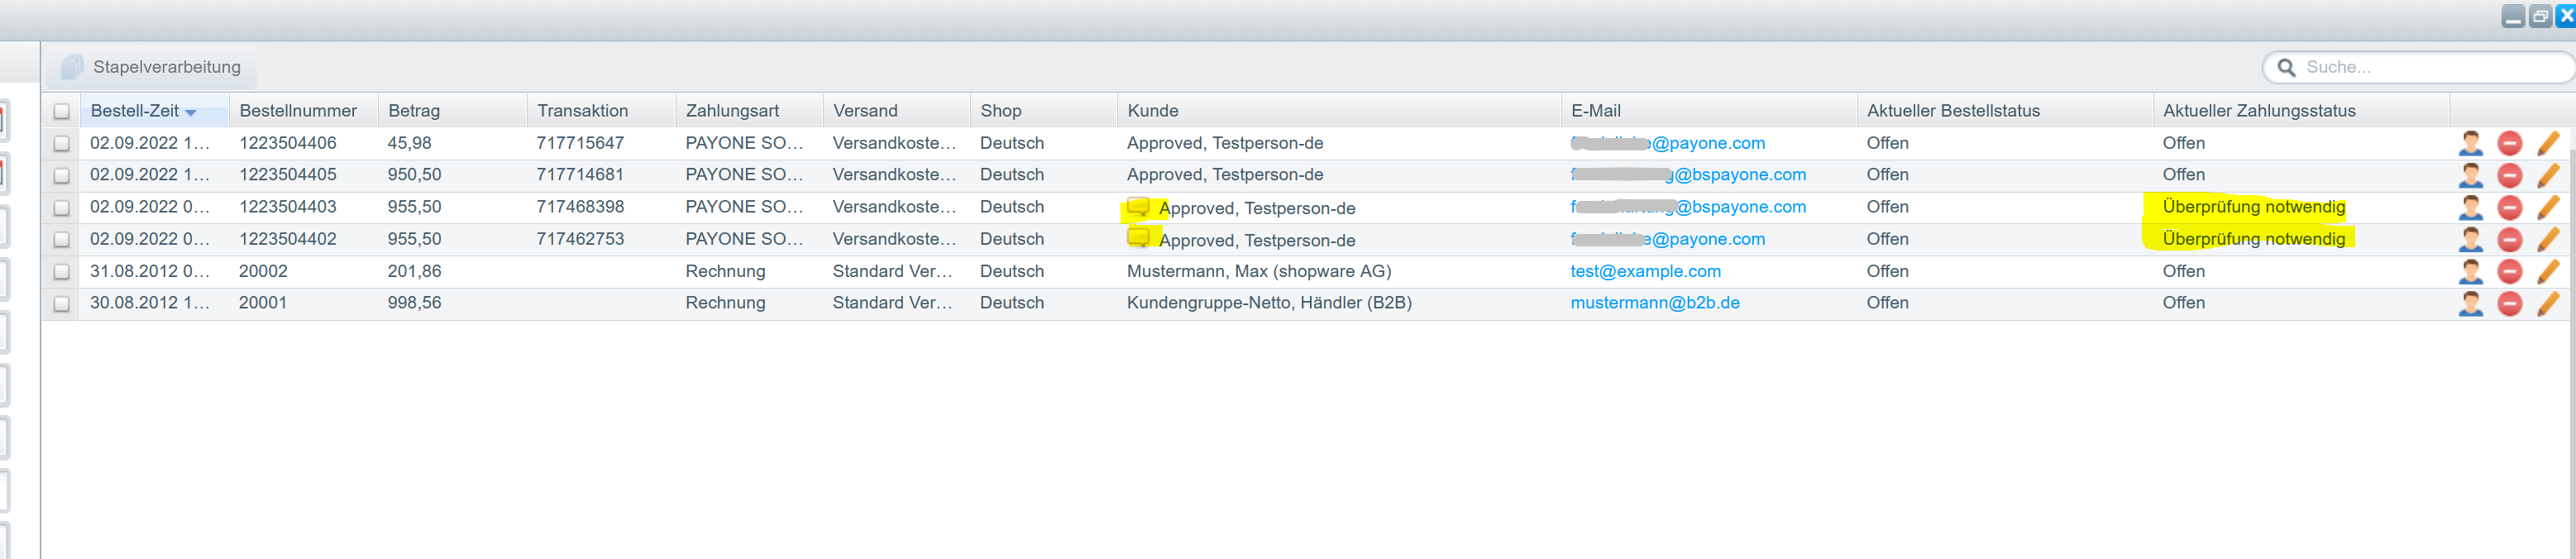
Marking of Conspicuous Orders
If there are discrepancies in an order, the order will be marked with the status "Verification required". In this case, the amount in Shopware 5 should be checked with the amount in PAYONE Merchant Interface (PMI), as this could be a fraud attempt.
You can use the following options only if you have ordered the Protect module from PAYONE. The use of address checks is associated with variable costs per transaction.
Under Customers → Payments → PAYONE → Configuration → sheet "address check" you can define if and in which form the address checks should be performed and how the Shopware eShop should behave if certain results apply.
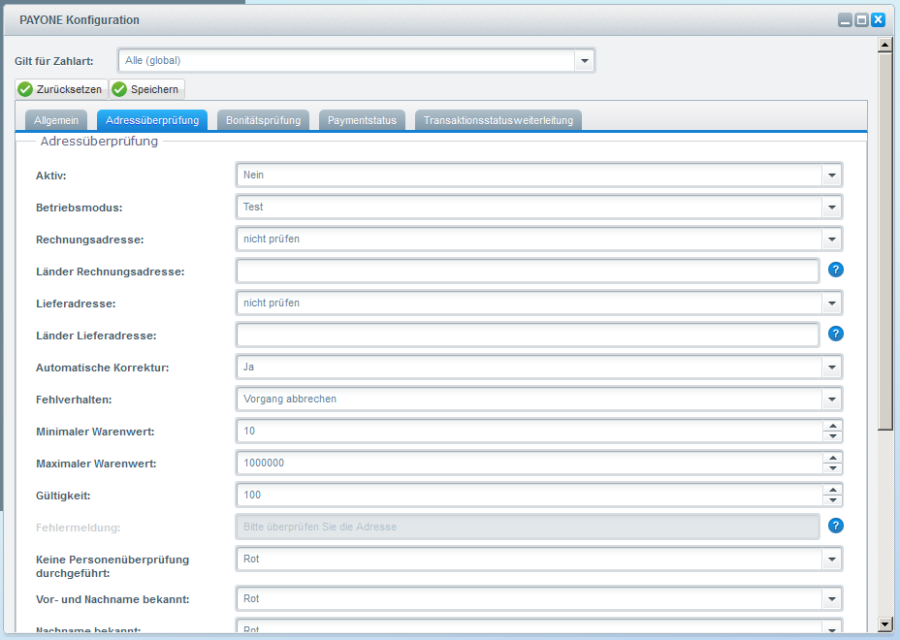
| Field | Description |
|---|---|
| Active | Activates the address check |
| Operating Mode | Setting in which mode the address check should take place: in test or live. Test and live data are different. |
| Billing Address | Do not check - No address check is performed Basic - Address check for existence and correction Person - Checking whether the person is known at the address given (Germany only) |
| Auto Correct | If Yes is selected, an address corrected by the PAYONE platform will be adopted. |
| Minimum Basket Value | Shopping cart value from which an address check is performed |
| Validity in Days | The duration in days for registered users in the shop for which the result of the verification is valid. |
You can use the following options only if you have ordered the Protect module from PAYONE. The use of credit checks is associated with variable costs per transaction.
Under Customers → Payments → PAYONE Control Center → Configuration → sheet "credit assessment" you can specify whether and in what form the credit checks should be performed.
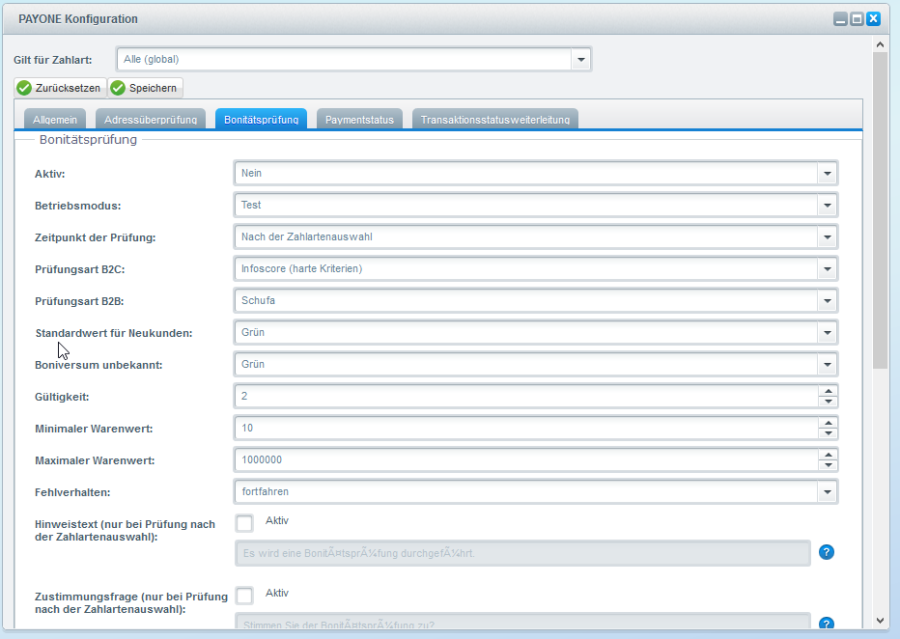
| Field | Description |
|---|---|
| Active | Activates the credit check |
| Check Type B2C | Infoscore (hard characteristics) - Check for hard characteristics Infoscore (all characteristics) - Check for all negative features Boniverse VERITA Score - Check for VERITA-Scores via Boniversum |
| Check Type B2B | Determines whether corporate customers are to be checked. |
| Minimum Basket Value | Shopping cart value from which a credit check is carried out. |
| Validity in Days | Number of days for which the credit standing value returned is valid. |
Under Customers → Payments → PAYONE → API-Log you will find all information about the processed payments and communication with the PAYONE platform.


Under Customers → Payments → PAYONE → Transaction Status-Log you have an overview of the transaction status messages received and can view details by clicking on a record.

Risk Management
With the PAYONE plugin for Shopware, you can control which payment methods are offered to your customers depending on their creditworthiness. Under Configuration → Risk management you can determine whether a payment type is blocked based on a defined traffic light value.

Shipping Costs
To ensure smooth operation of the plug-in, it is necessary to assign shipping rates to each payment method. As a further option, you can define an alternative shipping type that always takes effect if no concrete shipping cost record is assigned to a payment type.

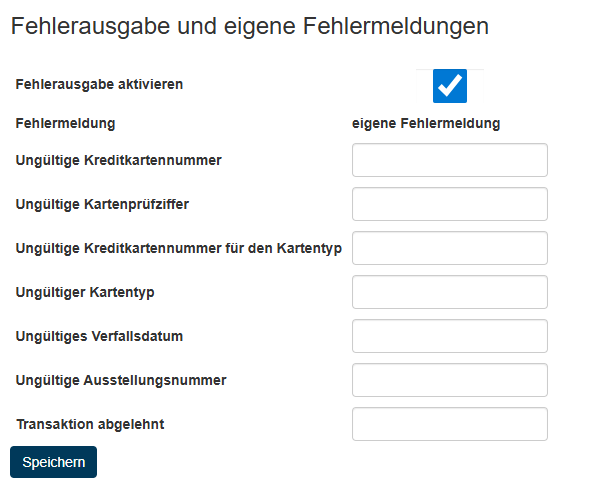
Customizing Snippets
For the display of certain texts, text modules have been provided with the installation of the plug-in, which you can adapt according to the language used in each case. You find the administration of the snippets under Configuration → Snippets.
Duplicate Payment Method
Under Configuration → Payment methods you can copy the payment methods for separate use, with a subshop or other reasons such as country assignments.