Quick Start Guide - English
Before You Start
This Quick Start Guide is a step by step instruction for the setup process of the PAYONE Platform. The guide uses examples to demonstrate the set-up and configuration process of the merchant account, the utilisation of the various interfaces as well as the PAYONE Merchant Interface (PMI).
The modular design of the PAYONE Platform allows you to choose the ideal range of services to suit your business model and your particular requirements. The examples used in this Quick Start Guide are based on a particular configuration – simply adapt these settings according to your needs.
Additional supporting documents will help you with this, for example the technical reference documents (API documentations). Should you still need further assistance with any particular item, simply contact the PAYONE Merchant Service who will be happy to help you.
---end
To actively follow the steps described below, one of the following conditions should be met:
You have received your user name and password (in a separate e-mail after the order has been accepted by PAYONE).
This data is used for logging into the PMI, the centralised web-based management interface of the PAYONE Platform.
---end
You have received the credentials for a test account and want to try out the system with no obligation.
---end
Step by Step to Your First Transaction
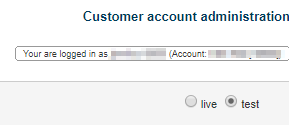
If you execute requests in live operation, these will be transmitted externally upon submission – using the test data. If, for example, this operation initiates the dispatching of documents by mail or a chargeback, this will incur real costs. Therefore, always check whether you have selected the right mode before triggering any operation.
Some payment methods require more data than others, so the live mode may not work. This is only activated in the service once all data is available and/or all risk checks have been completed. You can then switch to live mode in the shop.
---end
Setting up Your Merchant Account
Step one on the way to your first transaction is to log in to the PAYONE Merchant Interface (PMI) via the URL https://pmi.pay1.de or via the link on www.bspayone.com (Login -> Merchant Interfaces -> Login)
Please register with your user name and the corresponding password, which you must change after your first login. Your merchant ID, displayed within the PMI in the top right corner, serves as a reference for service requests and should therefore be stated whenever you contact PAYONE.
---end
---end
Configuring a Payment Portal
Each payment process must be assigned to a particular payment portal within the PAYONE Platform. In the course of the set-up process, the PAYONE service team has already created at least one payment portal for you, which you must configure now. To do this, go to Configuration and select the item Payment portals. You will be shown an overview of all existing payment portals.
Depending on the selected portal, you must enter various data. The example used here shows the configuration of the portal type Shop (see info box on the right). You can edit the name of the portal that was entered by the PAYONE team.
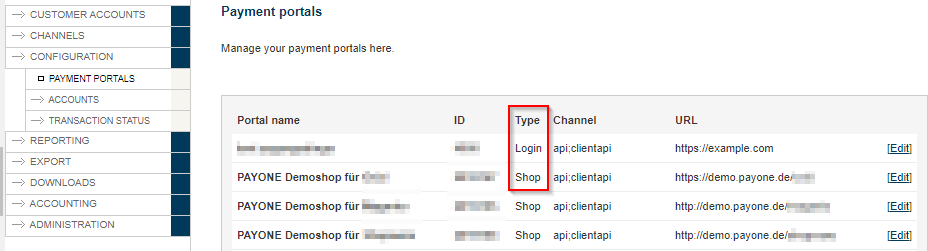
What is a payment portal?
A payment portal contains the settings for payment transactions and debtor management. The PAYONE Platform will select one of two types of billing depending on the selected payment portal:
- Shop type payment portals invoice by event, such as the purchase in your online shop.
- Login type payment portals invoice based on a predefined time period, for example monthly subscription fees or a video flat rate.
---end
In order to create a Shop type payment portal, all you need to do after naming the portal is to specify the shop URL using the format http://www.yourURL.com . Depending on the options you have booked, you may be required to enter a return address for e-mails that automatically dispatched to your end customers by PAYONE. In addition, the PAYONE Merchant Service will enable the selected interfaces after booking.
For a payment portal of the Login type, at least one offer must be created that has not yet been created.
---end
General


---end
Extended
After that, continue with the configuration in the next tab Advanced. Here, you should enter the transaction status URL, i.e. the address to which PAYONE is supposed to transfer status changes for all payment processes and other payment-related information via HTTP request. It must follow the format http(s)://www.yourURL.com . In addition, this is where you select the key (see info box).
What is the key?
In order to ensure that only you as the legitimate merchant access our platform, you have to determine a key. This personal identification is known only to you and it is transmitted as an MD5 hash value (in lower case letters) each time a PAYONE interface is invoked.
You can choose the key freely, it is mandatory to use at least 16 randomly selected characters (lower and upper case letters, special characters, numbers, no diacritic signs, maximum 150 characters) for your key. For example:
vX80Tevkx#3Gp86g%w9!
recommended is at least 30 characters
Never share this key with any third party!
---end
---end
You can make a number of general provisions in the PMI, which you can overwrite individually with the parameters for the respective API request at a later point in time. As a basic rule: An API request is rated higher than settings made in the PMI. For details please refer to the API documentation. The following advanced settings can be overwritten:
- The Return URL to which a consumer is redirected if a transaction was unsuccessful, for example when he or she decides to cancel the purchase after being forwarded to a payment site such as PayPal.
- The Success URL to which a consumer is directed if the order was passed successfully.
- The purpose that the consumer will see on his or her bank account or credit card statement for direct debit or credit card payments.

The last field is used to add front end user interface templates. You can add standard templates for the layout of the user interface, which can be further customised in an advanced dialogue. Thus, the fields seamlessly integrate into the design of your online offer, meaning that the consumer is not aware of PAYONE's interference during the checkout process.

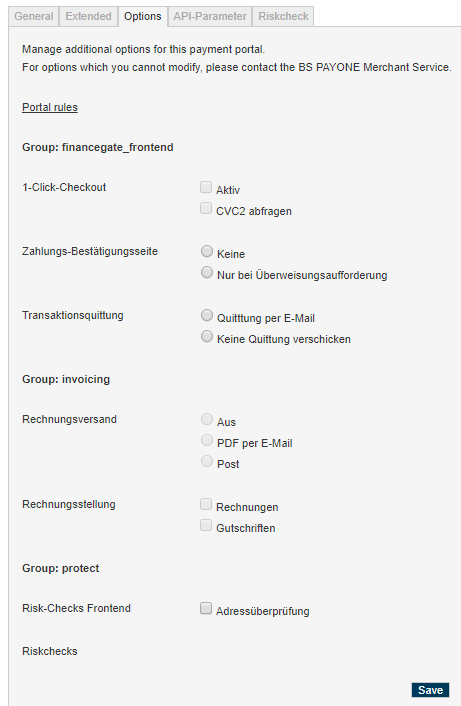
Options
The [Options] tab is already preassigned by us when you create your account and can be edited in part by you.

---end
Creating Sub-Accounts
Subaccounts are used for purely analytical purposes and can be created on your own terms. You are required to create at least one such subaccount. The number of subaccounts is limited to 100 subaccounts. If you need more subaccounts, please contact our customer support.
Application examples for sub-accounts:
If you operate your online offer in several different countries, sub-accounts provide you with a convenient tool for breaking down your sales by country. It is also easy to analyse your turnover from different lead sources using subaccounts. Further examples would be discount promotions, filtering by article groups or the division into summer and winter months.
The current application is executed via the aid parameter, which is transmitted as part of the corresponding request (see API documentation: Server API, Frontend, Client API ).
---end
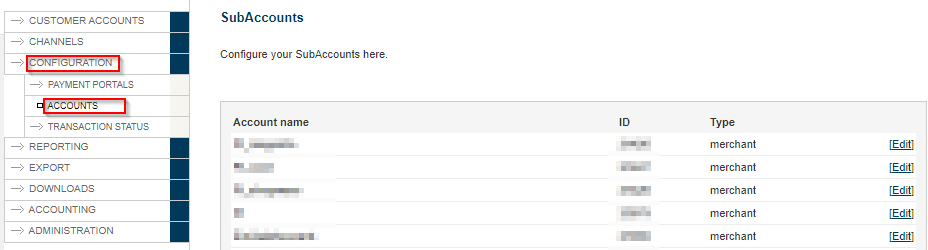
By default, there is no subaccount yet.
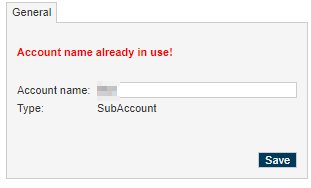
In order to create a subaccount, go to Configuration >> Accounts. Click Add account and enter a name for your subaccount.
---end
---end
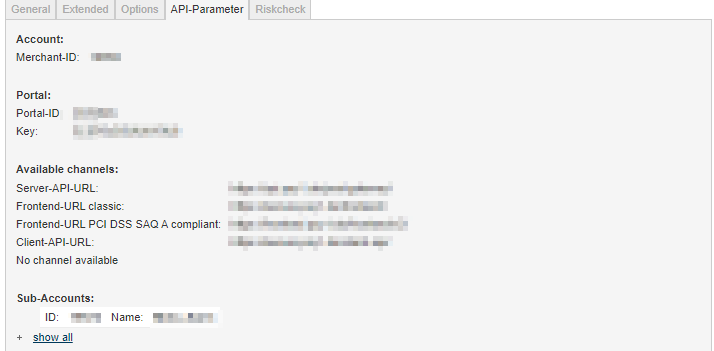
The Most Important Account Data at a Glance
Do you use PAYONE via an extension such as Magento, OXID or pixi*?
Then you must enter additional data such as the portal ID in your module. These and other required data can be found under:
API Parameters
You will also need these data for connecting the different interfaces.
Depending on the interfaces employed, you are now ready to use the PAYONE Platform to process payment transactions in various ways.
---end
Communicating with the Platform via Interfaces
There are substantial differences in terms of the various interfaces' functionalities. For a comprehensive description, please refer to the PAYONE Platform specification of services. The following table provides a brief overview:
| Description | Server API | Client API | Frontend |
|---|---|---|---|
| Simplifying PCI DSS certification as a merchant | |||
| Reservation | |||
| Purchase | |||
| Payment collection | |||
| Posting of credit memos | |||
| Posting of receivables | |||
| Updating of customer data | |||
| Control of the dunning process |
---end
PCI DSS:
Security for credit card details
The Payment Card Industry Data Security Standard (PCI DSS) is a set of rules regulating the handling of credit card data. Every company that processes or stores credit card data must pass certification. The client API and the front end, however, allow you to simplify the cost-intensive certification process as a merchant by redirecting all sensitive data directly to PAYONE for processing. PAYONE itself is certified according to the highest PCI DSS level 1. For more information, please refer to our PCI DSS info sheet. Upon request, we will send you a copy of this document. Alternatively, you can download it directly from our website.
---end
Invoking the Platform Using the Example of the Client/Server API
Each payment process can be mapped as a series of individual process steps – in so-called sequence diagrams.
The following two examples show common business transactions in an online offer from the purchase to the delivery of the goods. The commands used and the sequence may vary depending on the selected connectivity option.
You will find details on the interface you use in the technical reference documents (API documentation).
A variety of solutions:
The PAYONE Platform supports a variety of payment methods and options to adapt to your particular business model. Find out more about the offered solutions in the PAYONE Platform services specification or contact our sales team with any questions.
---end
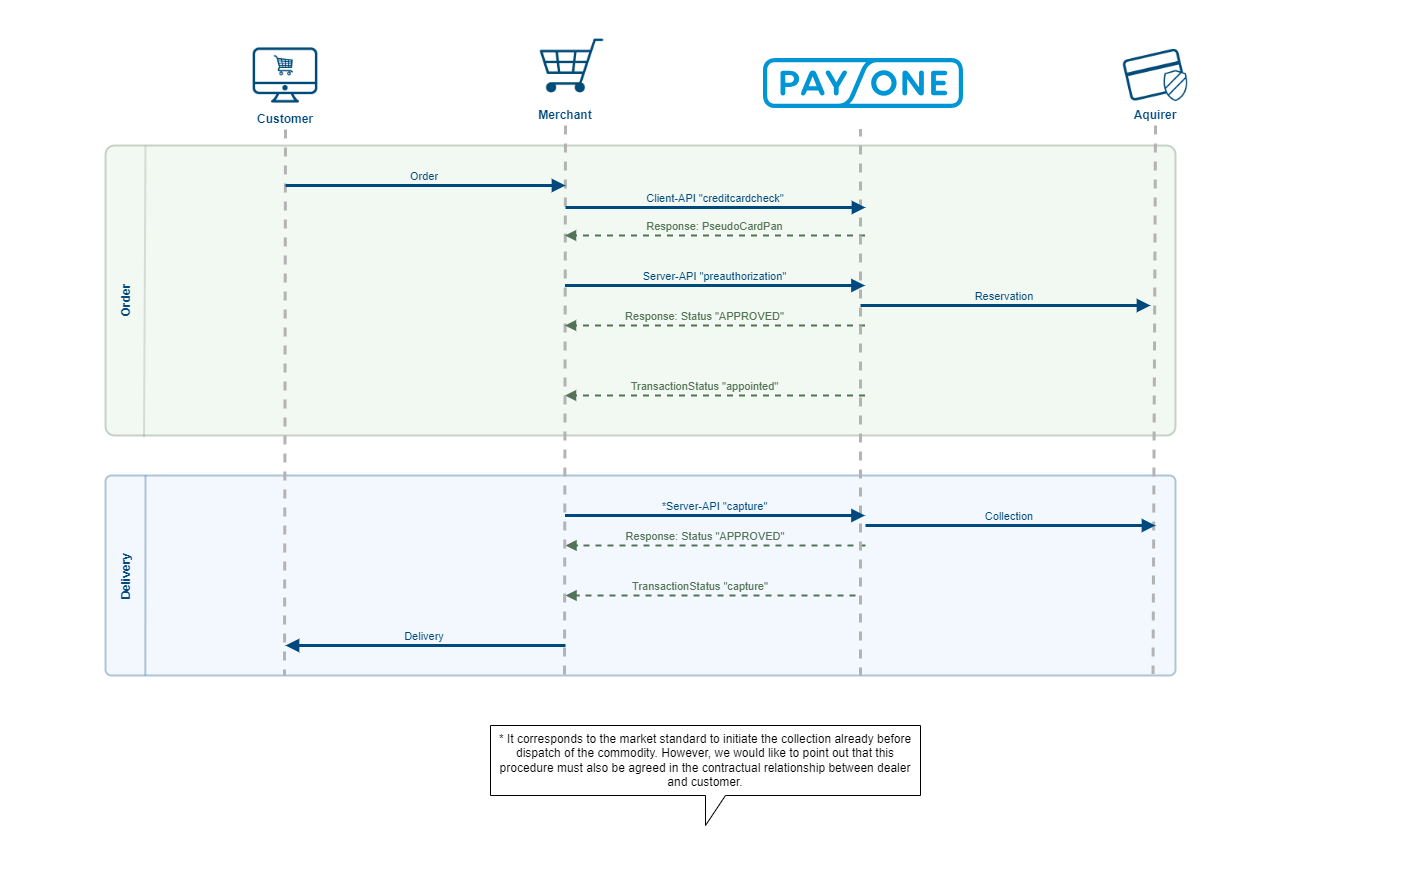
Sequence Diagram of a Credit Card Payment with Pre-Authorisation
As an example, we will elaborate on the procedure of a credit card payment with reservation and collection.
---end
After placing the order, the consumer's credit card details are transmitted via an AJAX call to the client API, for example. The request employed for this is creditcardcheck. This checks the respective credit card for plausibility in real time. In addition, this request allows you store credit card data (cardpan, expiration date) with PAYONE. In this case, the response returns a so-called pseudo card number (pseudocardpan), which can be stored by the merchant and later re-assigned to the real credit card by PAYONE. This means that the merchant does not have to be certified according to PCI DSS (see above).
---end
The next step is the request preauthorization which triggers the reservation of the amount of the order at the acquirer, i.e. your credit card acceptance partner. This process will reduce the consumer's credit card limit accordingly. Other parameters that can be transmitted with this request include the consumer's customer number or the delivery address. You can freely adapt the layout of the requests according to your individual needs. A successful transmission is confirmed by changing the status to approved.
---end
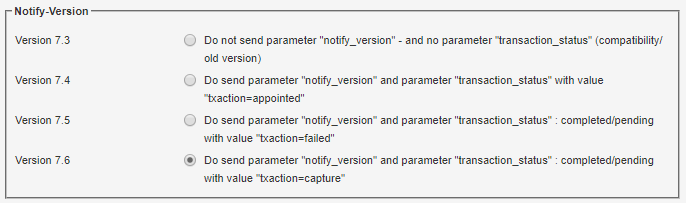
The next sequence is the transmission of PAYONE's so-called TransactionStatus in form of a message reading appointed. This confirms the successful initiation of the payment process. The payment is now reserved and the consumer's payment process completed.
---end
Once the ordered goods are available and the shipment to the consumer has been initiated, you can use the request capture to debit the previously reserved amount from the consumer's credit card as the next step.
---end
A successful submission of the request is equally confirmed with the status approved and the subsequent collection of the amount is reported by PAYONE using the TransactionStatus capture. The final sequence is the acquirer's payout of the credit card payment to you.
---end
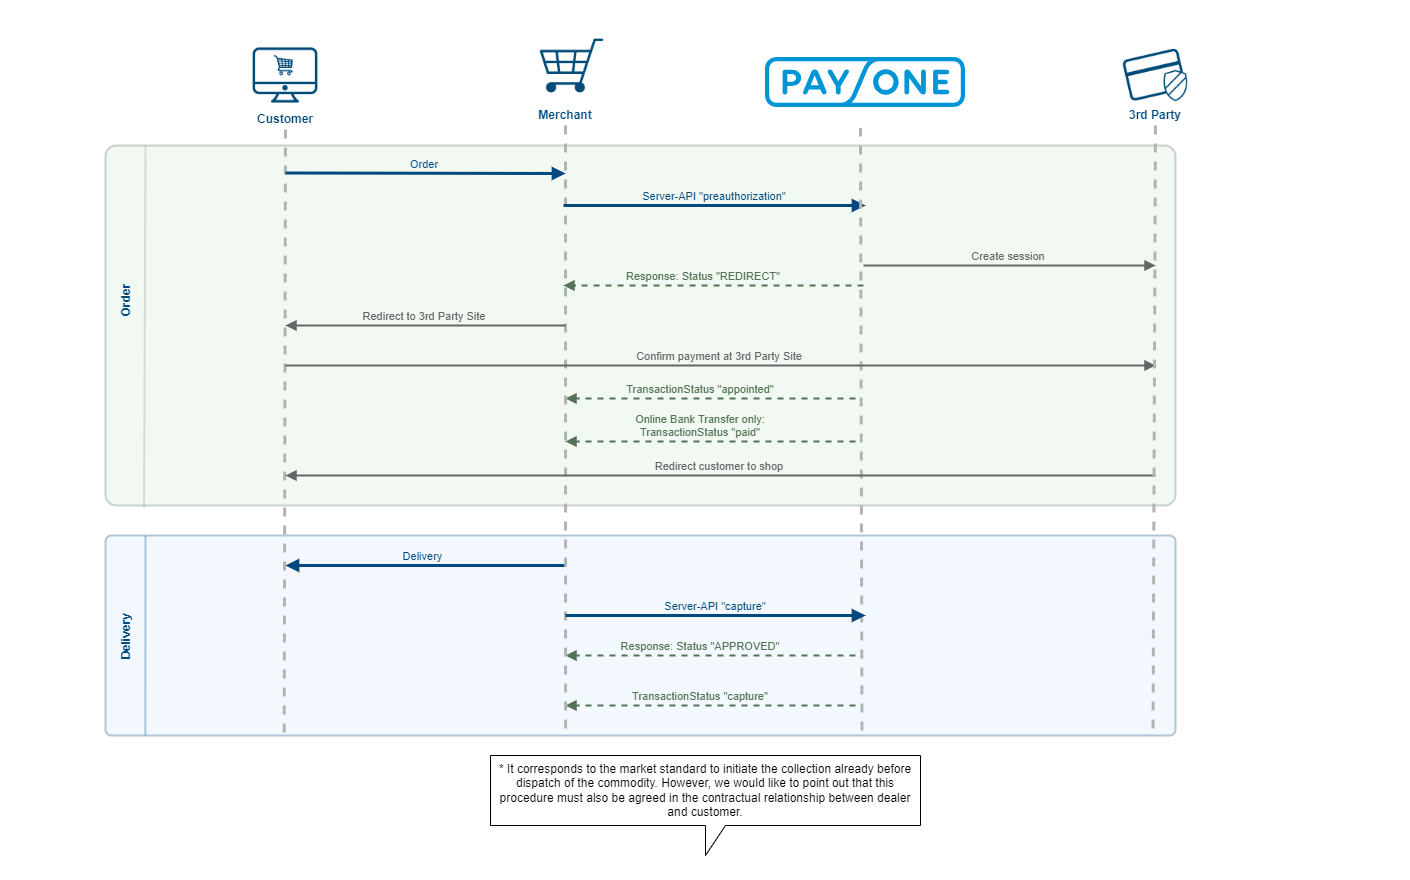
Sequence Diagram of an Online Bank Transfer
---end
Also when using an online bank transfer the placement of the consumer's order is followed by the request preauthorization. In addition to any required address data, the system can transmit other information such as the consumer's account number and bank code, which also need to be entered in your checkout. This way, the consumer's account details can be checked at the same time as the online bank transfer session is initiated. Furthermore, the account details are stored for any refunds due to returns.
---end
After the response redirect the consumer is redirected to his or her bank. There, the consumer uses his or her account data to log in via the usual user interface and confirms the payment.
---end
The consumer's bank subsequently notifies PAYONE about the successful payment and the consumer's account is debited immediately (as opposed to the preliminary authorisation for credit card payments). PAYONE then transmits the TransactionStatus appointed which confirms the successful payment. The consumer is finally redirected to the success URL of your website.
---end
The subsequent sequence of shipping the goods is followed by the posting of the receivable using the request capture.
---end
Here again, the response approved confirms the successful transmission of the request and is formally closed with the transmission of the TransactionStatus capture. The payment is made directly to the bank account that you have specified during the PAYONE activation process.
---end
Transaction Logs: Troubleshooting
Your transaction was not completed successfully? An open transaction status can have a number of reasons. You will get a first hint in the PAYONE Merchant Interface (PMI). Go to the Debtor administration and search for the transaction using the PAYONE payment process ID (TX-ID). Once you have found the dataset, click on Details for more information on the payment process: Here, you will find the field Cause of fault. If the information given here is insufficient for understanding the cause, go to [Configuration] >> [Transaction status] to view all currently blocked transactions and access additional details about the cause of the fault, provided the fault is not older than 48 hours and has not exceeded the maximum number of 12 attempts.
Access Rights
If you are in need for more logins, so is it with the approbriate permissions at any time possible to maintain existing access rights or create new logins. You can for example give employee in customer support, accounting, technical service or maybe even external employees personalised access logins. Every login can get different access levels for subaccounts (see below) and arccodingly write and read permissions allocated.
